
Are your hydraulic mountain bike brakes not performing as well as they used to? Don’t worry, we’ve got you covered. In this article, we’ll explore the ins and outs of adjusting hydraulic mountain bike brakes. Whether you’re a seasoned cyclist or just starting out, having brakes that function properly is essential for your safety and enjoyment on the trails.
So, how to adjust hydraulic mountain bike brakes? That’s the burning question we’ll answer here. But before we dive into the step-by-step process, let’s take a moment to appreciate the importance of properly adjusted brakes.
Ensuring your brakes are in top-notch condition not only improves your bike’s overall performance but also enhances your confidence on the descents and provides peace of mind knowing that you can rely on your stopping power. Without further ado, let’s get those brakes dialed in!
Adjust Hydraulic Mtb Brakes: Diy Guide
Riding a mountain bike can be an exhilarating experience, but it’s crucial to ensure that your brakes are in optimal working condition to maintain safety on the trails. Hydraulic mountain bike brakes offer reliable and consistent stopping power, but like any mechanical component, they require periodic adjustments to perform at their best.
Why Adjusting Hydraulic Mountain Bike Brakes is Important
Before diving into the adjustment process, it’s important to understand why adjusting hydraulic mountain bike brakes is essential. Here are a few reasons:
1. Safety: Properly adjusted brakes ensure that you can stop quickly and effectively, avoiding potential accidents or collisions on the trails.
2. Performance: Well-adjusted brakes optimize your overall biking experience by providing consistent stopping power, enhancing control, and reducing brake fade.
3. Durability: Regular adjustments prevent premature wear and tear on your brake components, extending their lifespan and saving you money in the long run.
Tools You’ll Need
Before getting started, gather the following tools:
- Allen wrench set
- Brake pad alignment tool (optional)
- Rotor truing fork (optional)
- Clean cloth
- Isopropyl alcohol
- Brake fluid (if necessary)
Step-by-Step: How to Adjust Hydraulic Mountain Bike Brakes
Now that you have your tools ready, let’s dive into the step-by-step process of adjusting hydraulic mountain bike brakes:
Step 1: Assess Brake Performance
Before making any adjustments, it’s essential to evaluate the current performance of your brakes. Ask yourself the following questions:
- Do the brakes engage quickly when the levers are pressed?
- Is there any excessive noise or vibration when applying the brakes?
- Are the brakes soft and lacking stopping power?
- Are the brake pads wearing unevenly or rubbing against the rotor?
Identifying any specific issues will help you determine the necessary adjustments.
Step 2: Check The Brake Pad Wear
It’s important to regularly inspect your brake pads for wear. To check the pad wear, follow these steps:
- Locate the brake pads on the caliper – one on each side.
- Measure the remaining pad material with a ruler or use the wear lines on the brake pads.
- If the pad thickness is below the recommended minimum, replace the pads before proceeding with adjustments.
Step 3: Clean the Brake System
Over time, dirt, debris, and brake dust can accumulate on the braking system, affecting performance. Cleaning the brakes will ensure optimal functionality. Here’s how:
- Wipe down the brake lever, caliper, and brake rotor with a clean cloth to remove any loose dirt or debris.
- Using isopropyl alcohol, clean the rotor surface to remove any oil or contaminants.
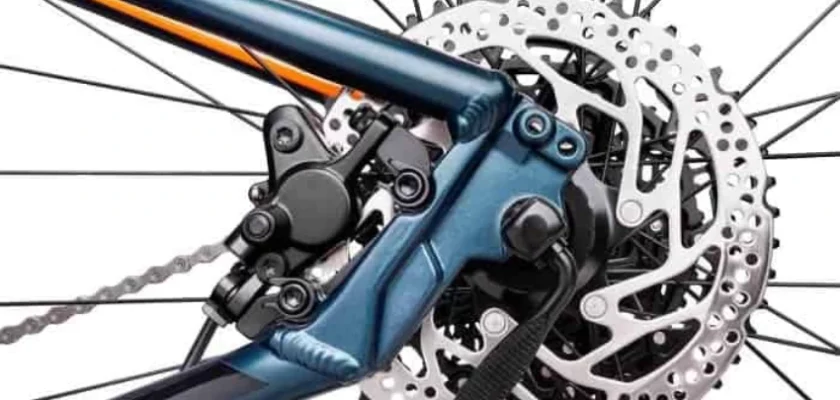
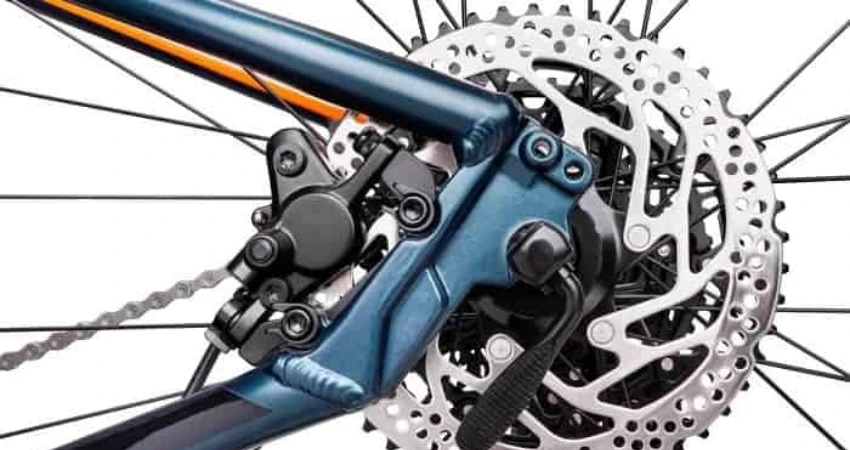
Step 4: Align the Brake Caliper
Proper alignment of the brake caliper is crucial for optimal brake performance. Here’s how to align the caliper:
- Loosen the bolts attaching the brake caliper to the frame or fork just enough to allow movement.
- Squeeze the brake lever to engage the pads against the rotor.
- While holding the brake lever, tighten the caliper bolts to secure its position.
- Repeat this process on both sides of the brake caliper to ensure even alignment.
Step 5: Adjust Brake Lever Reach
Adjusting the brake lever reach allows for comfortable and efficient braking. Here’s how to do it:
- Locate the reach adjustment dial on the brake lever. It’s typically found near the point where the brake cable enters the lever.
- Use an Allen wrench to turn the reach adjustment dial clockwise or counterclockwise until you achieve your desired lever position.
- Test the lever reach by squeezing the brake lever. It should engage smoothly without excessive force.
Step 6: Check Brake Lever Free Play
Free play refers to the distance the brake lever can move before any resistance is felt. To adjust free play, follow these steps:
- Locate the free play adjustment screw on the brake lever. It’s often found near the pivot point of the lever.
- Turn the adjustment screw clockwise or counterclockwise to increase or decrease the free play, respectively.
- Test the lever by gently squeezing it until you start feeling resistance. The lever should engage without excessive movement.
Step 7: Bleed the Brakes (If Necessary)
If you notice inconsistent braking performance or a spongy feel in the lever, it may be necessary to bleed the brakes. Bleeding removes air bubbles trapped in the hydraulic system.
Note that bleeding can be more complex and may require extra tools or professional assistance. Consider referring to your bike’s user manual or seeking professional help if inexperienced.
Frequently Asked Questions
1: How do I know if my hydraulic mountain bike brakes need adjusting?
If your brakes feel spongy, make noise, or the lever has excessive play, they may need adjusting. Inspect the brake pads, rotors, and fluid level before proceeding.
2: How can I adjust the lever reach on my hydraulic mountain bike brakes?
Most hydraulic brake levers have reach adjustment screws that allow you to change the distance of the lever from the handlebar. Use a 2.5mm Allen key to turn the adjustment screw until you achieve the desired reach.
3: How can I fix brake rub on my hydraulic mountain bike brakes?
To fix brake rub, loosen the mounting bolts on the caliper slightly, then squeeze the brake lever to center the caliper. While holding the lever, tighten the mounting bolts evenly, and check for any remaining brake rub.
4: How do I bleed air from my hydraulic mountain bike brakes?
To bleed air from your brakes, start by attaching a bleed kit to the brake lever and caliper. Follow the specific bleeding procedure outlined by the brake manufacturer, adding fresh brake fluid as needed.
5: Why are my hydraulic mountain bike brakes still not working properly after adjusting?
If adjusting the brakes doesn’t solve the issue, there may be more significant problems like worn brake pads, contaminated fluid, or a malfunctioning caliper. In such cases, it is best to consult a professional bike mechanic for further inspection and repair.
Final Thoughts
In conclusion, adjusting hydraulic mountain bike brakes is a crucial task to ensure optimal performance and rider safety. By following a few simple steps, riders can easily maintain and adjust their hydraulic brakes as needed.
Regular inspections, adjusting the lever reach and bite point, and bleeding the system when necessary are all key aspects of brake adjustment.
By understanding the mechanics and components of hydraulic brakes, riders can maximize their effectiveness and enjoy a smooth and controlled riding experience. So, next time you hit the trails, remember to take a few minutes to adjust your hydraulic mountain bike brakes for a safe and enjoyable ride.