
There are many kinds and variations of Bike Headsets. So, it is obvious that Bike Headsets cannot be universal. In today’s complete article, I will tell you about whether Bike Headsets are universal or different. Also, you can learn about the different types of bicycle headsets, and the differences between them. Moreover, I will give details about the bike headset size chart, what size headset will be perfect for your bike or how to set the headset on the bike, and more things related to this.
And, all these things will be very important in your future cycling life as the bike headset is an important part of a bike. By reading today’s complete article, you will know the details about all those important parts.
What Is A Bike Headset?
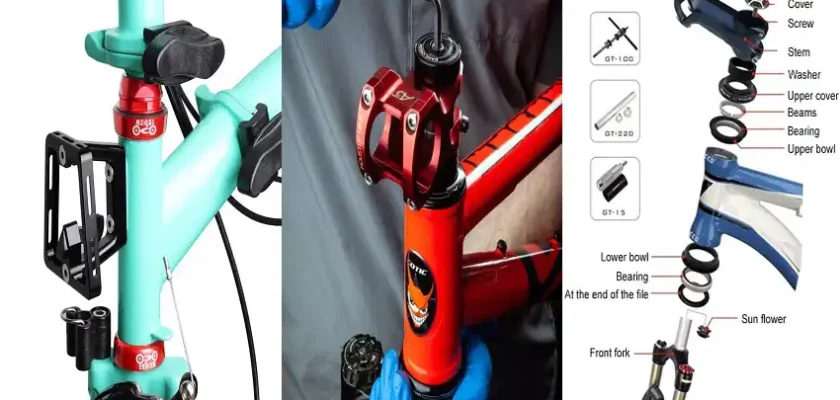
A bicycle headset is a set of components on a bicycle that creates and provides a special rotatable interface between the bicycle fork and the head tube of the bicycle frame.
- The head tube that goes through the steerer tube of the bicycle fork is called the head tube.
- Headsets usually have two cups that are usually pressed into the top and bottom of the bike’s headtube. The two cups on the bicycle have bearings on the inside of the cups, which provide a special low-friction contact between the bearing cup and the steerer as well.
Most of the time riders ignore and neglect the bicycle headset, but if you look carefully, you will find that the bicycle headset is considered one of the essential parts of your bike. Notice that the headset on your bike helps keep the fork connected to the bearing assembly on the bike. And, this bicycle headset specifically helps you to turn the handlebars as well as the cut of your bicycle while riding the bicycle. This is how all types of bicycle headsets work in most cases.
- If you look more closely, you will find that in every headset you will find two bearings, one at the top and the other at the bottom of the headtube. To put it more simply, a bike’s headset is usually a large set of bicycle bearings that allow the bike’s fork steerer to rotate inside the frame’s head tube.
- Also, you will find a special collection of cups and spacers in addition to the bearings that allow the headtube to sit inside the headset.
Speaking of different types of bikes, it can be said that when you finish biking with a mountain bike, that bike can place a hefty demand on the headset. Besides that, Cyclocross bikes also have similar demands while riding.
When it comes to the great headset, it is a headset that you can easily install on the head tubes of any of your bikes. Apart from that, you don’t have to face any problems and worry about the headset for a long time. Different headsets are specially designed to remain lubricated during proper installation in various types of dirt and water.
Types Of Bike Headsets
There are several different headsets depending on how the bearings are held with a lock nut or with a clamping stem, or where they are located inside or outside the head tube.
1. Threaded Bike Headset
Threaded headsets are used with forks that have threaded steerer tubes and are the conventional type. A threaded headset consists of eight parts from bottom to top: crown race, lower bearings, lower frame cup (illustrated as “lower head-tube race”), washer, locknut, upper frame cup, and upper bearings, and upper race or cone.
A typical headset installation sequence follows.
- The steerer tube is cut to the appropriate length by the bicycle fork manufacturer and threaded onto the top of the steerer using a 1-22 (2.5 To 5.1 cm) rolling process.
- This process ensures that no material is lost and the steerer is not weakened with dies or lathe cuts. And, Threaded forks require that the steerer threads only use 1 To 2 inches at the top, so forks are sold in various lengths.
If it is necessary to use a fork that is too long, meaning that the fork driver is not threaded far enough, the bicycle mechanic can use a die.
So, the process is- to stretch the thread. If the threads need to be cut an inch or more apart, this is not recommended. As a side note, one should not attempt to thread an unstitched steer at the end of production as this will weaken the steer tube.
- Threads are usually of the ISO standard, 1 by 24 TPI, but other standards exist. The headtube can be faced and then the cups are pressed into the headtube using a special press that ensures they are square and true.
- The fork crown can be faced and then the crown race is pressed into the fork with a special press that ensures it is square and true. Thus the bearings are then placed on top of the crown race after which the steerer tube is inserted into the headtube.
- And, the upper bearings are placed in the upper cup and the upper race is screwed to the steerer. A washer, often a keyed washer, is placed on top of the upper race and a locknut is screwed onto it.
2. Threadless Bike Headset
The threadless headset is a recent design US Patent 5095770 owned by Kane Creek Cycling Components and expired on September 29, 2010. These types of headsets are often referred to by Dia-Competition (now Cane Creek) with the registered trademark “Addset”, and are manufactured under license.
- Unlike threaded headsets, threadless headsets do not race threaded top headsets or use threaded steerer tubes. Instead, the steerer tube extends from the fork through the head tube and over the headset and is held in place by a stamp by stamp at the top.
Tightening the threadless headset requires tightening the cap’s preload bolt (or cap bolt) at the top of the stem. This bolt is attached to a star nut driven into the steerer tube which acts as an anchor by gripping the inside of the steerer tube with a downward force.
- The bolt compresses the stem into spacers, usually aluminum, which in turn compress the headset-bearing cups.
- The preload bolt does not hold the fork to the bike; after the preload is set, the stem bolts should be further tightened to secure the fork in place.
- And, the adjustment should be such that there is no play in the bearings but allows the fork to turn smoothly without binding or excessive friction.
Spacers in threadless headset systems are critical in placing the stem and preload bolts in the correct position on the steer tube. So, the stack height stem becomes important.
Also, The steerer tube of the fork should be cut to a length that leaves at least enough of the steerer tube above the headset to press on the stem;
- If the steerer tube is cut longer than the stem, spacers are used to fill the gap between the stem and the conical compression washer.
- Bicycle racers looking for a better saddle-to-handlebar drop to match the aerodynamic headset bearing cup stack height plus stem height will often cut spacers forefoot and steerer tube.
Comparison Of Threaded And Threadless Headsets
Threaded headsets have recently been replaced by threadless headsets on better-quality bicycles for several reasons:
- Threadless steerer tube forks are cheaper for manufacturers because they can be cut to size at the time of sale and manufacturers can use the same fork on different frame sizes.
By comparison, a fork with a threaded steer tube must match the headset tube length of a frame; Therefore, bicycle manufacturers have to make or buy different size forks for each frame size.
- Regular Allen wrenches can be used to adjust threadless headset bearings.
By comparison, larger and relatively expensive wrenches are needed to adjust threaded headset bearings; Their size doesn’t usually carry them on the road.
- Threadless headsets and forks are faster to install, saving manufacturing costs.
- A threadless headset and fork are slightly lighter than an equivalent threaded headset and fork.
- A threadless stem connects more rigidly to the forks, giving improved rigidity to the handlebars.
- On bicycles that have not been maintained, water can find its way between the threaded headset stem and the steerer tube, causing corrosion and seizure.
Threaded headsets have some advantages as well:
- Threaded steerer tubes are matched to the frame at the factory, making handlebar height adjustment easy.
- Threaded headsets use a quill stem that can usually be adjusted vertically over a greater range than threadless headset stems.
You May Like: Are Road Bike Stems Universal?
Are All Bike Headsets Universal Or Different?
You will find different types of bike headsets available in the market. I have already discussed all the headsets that are notable among them. So it can be said without a doubt that Bike Headsets are different.
As we know the headset is a set of components on a bicycle that provides a rotatable interface between the bicycle fork and the head tube of a bicycle frame.
- The tube through which the fork driver passes is called the head tube.
- A typical headset consists of two cups that clamp onto the top and bottom of the headtube.
- There are two cups inside the bearings which provide a low friction contact between the bearing cups and the steer.
Riders can choose all the perfect headsets for bicycles according to their preferences. Different types of bicycles require different sizes and also different types of headsets. Considering all these aspects, it can be said that bicycle headsets are of different types.
Standard Headset Size Chart
It is very important to know which headset size is perfect for your bicycle. If you don’t follow the Standard Headset Size you can face various problems while cycling. For your convenience, I am giving the Standard Headset Size Chart in the form of a table, and in addition, I will give details about this subject-
| HEAD TUBE SIZE | FIT | BEARING SIZE | DESCRIPTION | SHIS (Standard Headset Identification System) |
|---|---|---|---|---|
| 29.8 mm To 29.9 mm | Interference fit | 30.0 mm | Traditional JIS standard for 1-inch steering section, threaded and threadless headset. | EC 29 |
| 30.0 mm To 30.1 mm | Interference fit | 30.2 mm | Formal “Euro” standard for 1-inch steering section, threaded and threadless headset. | EC 39 |
| 33.8 mm To 33.9 mm | Interference fit | 34.0 mm | Traditional 1 To 1/8 inch for the threadless and threaded headset. | EC 34 |
| 36.8 mm To 36.9 mm | Interference fit | 37 mm | Formal 1 To 1/4 inch for a threaded and threadless headset. | EC 37 |
| 38.14 mm To 38.15 mm | Slip fit | 38 mm | Combined angular connection.
1-inch steering row. 36 x 36-degree connection. |
IS 38 |
| 41.05 mm To 41.1 mm | Slip fit | 41 mm | Combined angular connection.
1 To 1/8 inch directing row. 36 x 45-degree connection. “IS” or “Cane Creek categories. |
IS 41 |
| 41.3 mm | Interference fit | 41.4 mm | Low Profile.
1 To 1/8″ region, & bike head tube diameter 47 mm. The bike frame has no angular reference. |
ZS 41 |
| 41.55 mm To 41.6 mm | Slip fit | 41.5 mm | Combined angular reference.
36 x 36-grade connection. TH Industries ED 36 type. |
Obsolete |
| 41.85 mm To 41.9 mm | Slip fit | 41.8 mm | Incorporated angular connection.
45 x 45-degree reference. Campagnolo Hiddenset standard. |
IS 42 |
| 41. 9 mm To 42 mm | Interference fit | 42 mm | Microtech Integrated- non-angular communication.
The bike frame has no angular connection. |
Obsolete |
| 43.9 mm | Interference fit | 44 mm | Low Profile for 1 to 1/8 inch steering section
Cartridge bearing types utilize slip fit into pressed goblets. |
ZS 44 |
| 44.05 mm To 44.1 mm | Slip fit | 44 mm | Incorporated angular reference.
1 To 1/8″ steering section. 36 x 36-degree communication. |
Obsolete |
| 47.05 mm To 47.1 mm | Slip fit | 47 mm | Integrated lower only. | IS 47 |
| 49.6 mm | Interference fit | 49.7 mm | 1.5 Standard.
Oversized threadless type. |
EC 49 & ZS 49 |
| 52.1 mm To 52.15 mm | Slip fit | 52 mm | Integrated lower. | IS 52 |
| 55.90 mm To 55.95 mm | Press fit | 56 mm | Internal and conventional headset. | ZS 56 & EC 56 |
Regular Headset Size
Traditional bicycle head tubes and headsets are sized for a 1-inch diameter (25 mm) steerer tube; it’s also known as a fork column. Though many frame and fork manufacturers are now building their parts around a 1⅛ -inch diameter steer tube. And, the larger diameter of the head tube and headset gives more stiffness to the steering part of the bicycle.
Normal Size
- 1″ or 1 inch (25.4 mm). It may have a fork crown (the base of the fork steer tube) of one of several different dimensions. Some headsets may require milling to fit.
- 4mm ( ISO )
- 0 mm ( JIS )
- Originally branded 25″ or 1¼ inch (31.75 mm) Gary Fisher “Evolution”.
- 5″ or 1½ inches (38.1 mm), used as the OnePointFive international standard.
- Cannondale Headshok. Although a headshot steerer is close to 5″, it is 1.5625″ or 1 9/16 inches (39.6875 mm).
Headtube dimensions for 1.5″ and head shocks are very similar, differing only in minimum press depth.
- 5 inches to 1⅛ inch “tapered” headsets (after 2009). 1.5 inch lower bearing increase and upper 1⅛ inch stem interface for reduced weight and existing mill.
- The headset stack height is the total combined height of the headset components and, in the case of a threadless system, the thickness of the stem, the things that press into the head tube, and beyond in the case of a threaded headset the locknut top seal.
- Frame and fork stack height is the difference between steerer tube length and head tube length.
- Stack height is critical because a headset with a stack height greater than the frame and fork will not fit. And, the locknut will not thread sufficiently (threaded) or there will be no room for the stem (threadless).
How To Install A New Headset?
The things you need for installing a new headset on your bicycle-
- Headset press
- 5 mm Allen key
- Mallet
- Block of wood
- Crown race remover (optional kit)
- Large flat blade screwdriver
- Slide hammer (optional kit)
- Teflon grease
- Headset cup remover
- Hammer
- Torque wrench
Step 1:
First of all, choose a specific type of work stand for this task which can make the work much easier.
- Now remove the front wheel of the bicycle and then remove the front brake caliper from the fork. Be sure to properly remove the guide or zip tie that holds the brake hose on top of the bicycle fork.
Step 2:
You should properly remove the bicycle stem.
If you see, your bike’s stem has two bolts that hold the top of your bike’s steerer and is also turning the bike’s bolts a quarter turn in sequence. This can make it much easier to get your bike’s bolts back in place again. And any number of bolts your bike has can overload one of these bolts. Due to that, it is possible to avoid various possible damage to the bicycle. Now properly remove the gear cables from the slotted top part of the cycle
Plus it helps a lot to keep the head tube bar clear for mounting any new headset on your bike.
Step 3:
After that. remove the top cap while holding the fork. so that it does not go out of the frame.
Furthermore, you must remove stems and bars by calculating a unit. And keep them clean as well.
- Make sure you don’t pull or cut the hose too much with the rear brake hose.
- Now remove the headset spacers and then withdraw the bicycle fork.
- A rubber mallet can be attached to the end of a bicycle’s steerer for the period when the fork moves.
Step 4:
Well, if you don’t have a headset cup remover, now is the time to grab one! Since you’re about to replace your bicycle headset, it’s probably already pretty knackered. So, if you damage it further later it won’t be a problem.
- Now take a large hammer, then a large flat blade screwdriver and you will need to pry the cups of the headset properly.
- Here your main goal will be to knock out the headset bit by bit. It has to be ‘walked’ out by hitting the opposite side of the cup.
Step 5:
If it appears that you don’t have a crown race remover, then it’s time for your second round.
- Now employing a block of wood, the steerer should be properly placed on it and after that, the fork should be kept upside down.
- Then you will find it necessary to take a large flat blade screwdriver along with a hammer. The fork should strike the collar far away from the crown of the bicycle towards the crown race.
- As with the last step, it’s important to remove a lot. When the collar is ‘walked’ away from the bicycle’s steerer, you should hit it in the opposite direction.
Step 6:
Thoroughly clean the inside of your bike’s headtube and fork steerer. Once it looks clean, look at the head tube to see if it needs a generous coat of fresh grease on both ends where the new head cup will fit.
Not only will this help you press in a new cup, but it will also largely eliminate any creaking you might get from even the slightest movement of the cup through the frame.
Step 7:
- Fit the crown race of the bike with a slide hammer.
- A special type of workbench should be rested with the crown of the fork towards the corner to obtain a solid base. And, a new type of crown race needs to be slid over the top of your bike’s steerer.
- Besides that, the old crown race should be placed upside down. You can also use a wooden block and a hammer if you want.
- The crown race of cycling has to hit the spot. Again you can use a ‘walk’ technique and then hit 180 degrees. Then move a little more at a time.
Step 8:
Do not attempt to fit your bike’s headset cups with anything other than a press on the bike’s headset. It is important that the cups are correctly placed in the press of the headset and then slot perfectly into position. Moreover, it is also important to ensure that the bicycle cups start straight. That’s why go very slowly at first, then press hard.
Step 9:
Now one of your tasks will be to grease the cup that holds your bicycle headset. If it is the case that your bicycle headset has sealed bearings, then a healthy amount of grease in the cup will certainly go a long way in eliminating any creaking as well as reducing water ingress.
Now grease the inside of the cup and then the collar where the crown race of the top cup is. The cups in the frame that fit the bearings must be done correctly. Then it is necessary to add another special layer of grease on top of it.
Step 10:
Now the bicycle fork has to fit the headset.
- If you find different types of seals on the headset, you must make sure that they are all properly rounded. And also be careful not to pinch your bike when you slide the fork.
- The spacers on the headset and the accompanying stem should be slid back closer to the steerer.
If you have a different type of headset fitted to your bicycle, you may need to adjust by making a suitable gap.
- The stem of the bicycle steerer should be at least 3 mm shorter at the top end. Loosen the bolt holding the stem in place.
Step 11:
In this stage, move the front wheel of the bike towards the back and then reattach the caliper to the front brake.
- Keep in mind that the bicycle hose must fit properly in the retainer.
- Once it fits, you’re pretty much done.
- Now the hoses have to be re-fitted to their guides on the frame of the bicycle.
Step 12:
- Fit the bicycle fork top cap again and also use the bolts to adjust any play from the headset.
- Hold the bike’s front brake to check for proper play.
- Also, place your hand around the bottom cup of the bike’s headset and gently rock the bike back and forth to try it out. If it’s loose, retighten it a bit, then check again properly.
Step 13:
And, the final stage has come! Once the bicycle headset is adjusted so that it does not face any problems while cycling and can move freely.
- Tighten each bike bolt in sequence.
- Be sure to take a good set of Allen keys with you when you think about going for your next ride with your bike. The reason may be that the headset is likely to loosen after sitting in some places during cycling.
You May Like: How to Replace Mountain Bike Headset?
Some Popular Headset For Your Bicycle
Here, I will tell you about some headsets that are perfect for your bicycle. From among them, you can choose any headset according to your needs, without doubt, worry-free as all these headsets can give you favorable performance by far.
1. FSA Hammer Headset,1 To 1/8″ 34 mm I.D. Headtube
Special Features
- Package Dimensions: 5. 84 L X 5. 84 W X 8. 13 H in Cm
- Manufactured in Taiwan
- Forged and CNC Machined Crmo Cups
- FSA Sl-K RNUM x RNUMT Stem
- Oversized 1/4 Inch Bearings
2. Far better 1 To 1/8″ Heavy Duty Headset Top Cap Bearings, 34 mm/ 44 mm
Special Features
- High-Quality Steel Forged
- 44 mm (44 mm Frame Head Tube + 28.6 mm Fork Head Tube)
- Strong and Durable
- 1 To 1/8″ Threadless Headset
- Save Money and Worry.
- Made in Taiwan
- Durable, Lightweight & Smooth
- Suitable for MTB Bike & Road Bike
3. VGEBY1 Bike Headset Bearings, 34mm Bicycle Bearing Headset
Special Features
- Aluminum Alloy Construction can provide high stability
- Equipped with most CNC High Precision
- Straight Steerer Fork
4. Front Fork Bowl Set 1″-24T22.23027mm Bike Headset
Special Features
- Size: 1″- 24T* 22.2 * 30 * 27 mm.
- Applicable for most of the cycle
- Made with High-Quality Iron.
The Last Sayings
Hope after reading today’s complete article, you have learned various important information about bicycle headsets, types, differences among the headsets, bike headsets size chart, installing new headsets and some good bike headset recommendation with special benefits. Due to this, I think that you will not have to face any kind of problem related to the headset in your next cycling life.
And yes, there is a different headset for each model of bike or the same type of headset can be used on all bikes. Along with much other unknown information come to know, I think it is very important to know all this information and apply it in your real life as a proper cyclist.