
On a shiny day, you walked out and feel to go off-road biking, but your mountain bike doesn’t make you comfortable! It seems something wrong with the headset or handlebar. Or, maybe you are a regular MTB biker and you realize something deficiently bad with your bike, especially with the headset that needs to be fixed. From my experience, the uncomfortable sound or the harsh feeling comes from the handlebar due to improper maintenance, or maybe the headset badly needed a quick inspection.
In this article, I will acknowledge you about the mountain bike headset type, its components, and replacing, removing, installing process of the bike headset. So that you can do this job at your home easily. And during this process, I will start from the beginning with some related queries that will arise when we start overhauling our MTB bike headset procedure.
Are All MTB Headsets the Same?
The answer is- NO. There are many types of headsets out in the market. It depends upon some criteria like head tube type- is it press-fit or integrated? The most known headset names are-
- Threaded Headset (Old, Traditional Model)
- Threadless Headset (Common Headset)
- External Threadless Headset
- Integrated Headset (Modern Style)
- Semi-Integrated (Internal) Headset
Oh please, don’t be afraid of seeing the terms. You will get the general solution to service your mountain bike on your own. Those are just a name, and need not be afraid of. Believe me, after being done with the full overhauling of your headset for the first time, you will get all the solutions on your own whatever the headset type is.
When Should I Check My Mountain Bike Headset?
If the headset is grinding, gritty, and mucky or makes creaky sounds, then it is high time to check your headset. The old bearings, fork, gaskets, etc may be damaged partially or permanently and need to be replaced or cleaned. Most of the time the bearings are the main culprit for the rusty feeling. So after a few months, it is good to make a quick inspection into the headset parts. Only then you will be sure about your MTB or bike headset health which is generally ignored. And, if the headset is fully or 60% damaged, then the best solution is to replace it with the new one.
How Can I Choose Perfect Headset for My Bike?
Well, it is not rocket science. If you have the old feature paper of your bike, then already it is at your home. But if you haven’t any, then check out by following these facts-
- First, check out what kind of head tube you got? I mean is it threadless integrated or something else?
- Measure the inside diameter of your head tube
- Check out the diameter of the fork- Outside diameter, top and bottom diameter
- Now, write it down all the measurements you’ve got and go for the headset that matches the individual stats.
You will get your new headset or individual parts in the market. Furthermore, you can upgrade your old type headset with a new model which matches your headset type and measurement stats.
You Can Check: An Ultimate Guide: Best Headset For Mountain Bike
How Long A Bike Headset Usually Last?
It depends upon the bike you have bought and your maintenance procedure. In the perfect (dry) condition, the headset lasted two years, even more. But if you put your bike into a rough or wet condition, then it will definitely ruin after 6 to 7 months.
The most important fact is how well one can service his/her sweet friend regularly. It is always not necessary to replace the full headset, maybe it’s all about the bearing cage, or the washer, spacers that are only required to replace.
What Are the General Components into a Mountain Bike Headset Today?
Generally, every bike headset may be slightly different, but the basic parts and configuration are quite the same. Let’s check out those parts of the headset briefly. Then it is quite understandable when you are going to service your mountain bike headset on your own and save your bucks.
Here, I am going to talk about modern threadless (integrated) MTB headset components. But whatever your headset type is- you will get almost all of the components into your headset.
- Top Cap and Bolt: This unit is a similar working function for all MTB bike headsets. The type or name changed because of the headset type, that’s it. The top compression bolt stands middle of the top cap and screws into the star nut or expander. The top cap and bolt squeeze everything together into the headset parts. That means it holds the maintaining cast of a headset.
- Star Nut and Expander: This is the unique part of any integrated threadless fork only. As I say, there are slightly different types of headsets. And, the good thing is this part generally needs not to be changed. It is almost fixed inside the fork. The star nut helps the compression bolt to tighten up the headset components together. But if you have to replace and install it, then you have to pound this star nut or expander into the fork. It comes in 1-inch ½ inch or ¼ inch depending on your for’s inside diameter. It is also called a star-strangled nut.
- Dust Cap or Gasket: It stands over the spacer, compression ring, and top bearing. A dust cap is an essential part of all types of headsets. Because it prevents dirt from entering into the bearings, an effective sealed system.
- Spacers and Race/Compression Rings: First, keep in mind that, these components (how many spacers, mainly) vary from type to type. But you will find it on your headset. The races/split rings or compression rings are usually found over the upper cap or top seal bearing. And, over the races, spacers are situated. These spacers need to handle politely, they become damaged easily. The number of spacers depends upon your need and installation type (Generally, they are 0.1mm in thickness).
- Top and Bottom Sealed Bearings: These two sealed bearings are the inverse image of each other. The top or upper bearings sits on the head tube of a bike and the bottom or lower bearings usually inner sealed parts sit against the crown race. These are little parts of your headset.
- Crown Race: The common part of every headset system. It sits on the lower or bottom part of a fork, to be exact. Crown race is also known as fork crown. It has to be exact which stands opposite the compression rings, and over the fork steerer tube.
How To Service (Remove, Replace, and Install) Your MTB Headset at Home?
Every time it is not required to change the whole headset. But to maintain the headset properly for the long run, you must aware of how to remove, replace, and install your MTB headset.
Is it possible to do this job at home? – Definitely. It is not hard that you cannot do it yourself. Actually, it is a DIY job. You can easily service your headset whenever it needs, and need not look for a mechanic all the time.
What Type of Tools is Needed?
The following tools are required if you are going to service your MTB on your own whatever your requirement is, that means, remove, replace, or install process of a headset.
- A New Headset or Individual Parts of Headset which are damaged.
- Headset Wrenches/Torque Wrench (32 0r 36 mm, generally)
- Set of Allen Keys– otherwise, you have to be stuck in numbers (4.5.6 mm).
- Flat Screwdriver.
- Bike Grease.
- Hammer/Resin Hammer/Wood Mallet- it’s for a fully damaged headset that helps to hammer down the steerer if it sticks badly.
- Rubbing Alcohol- you can use it with a spray bottle. It is for cleansing the parts, especially the specks of dirt.
- Paper towel.
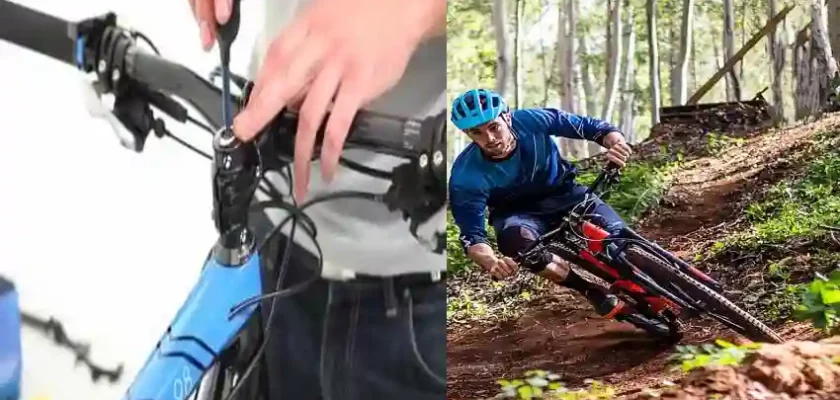
Need to service the headset for the creaking sounds or badly need to replace the headset parts? For all that kinds of reasons, a professional or an amateur biker must have knowledge of how to remove, replace, and install the bike headset properly. Now I am going to elaborate with at most easily. In this day, threadless integrated headsets are the common type for MTB bikes. So as an example, I am taking this type of headset removal for describing the procedure.
- Before removing the old headset, it is good to have a work stand that can hold the wheel off from the ground. But it is not mandatory, you just need to proper-hold over the front wheel.
- And if you are in this business for the first time, it is the best thing to capture images before removing the headset. Keep this task in the mind. This practice definitely helps you to re-arrange or put things together (assembling parts), properly.
- So, at first, you have to remove the fork, undo the wires that hold the cables. Here a 2-mm Allen wrench will do the work for you. After removing the wires, I hope you can easily remove the front wheel. And then, clear the brake pads or level if applicable (Depending on your bike, if you have V-brake).
- Actually, you need not remove the fork. But removing this thing will definitely help you handle the fork comfortably.
- For the removal of the fork, you have to loosen the tightening stem bolt or bolts. You may have a bolt, or, two, and the top cap bolt. Just take a quarter turn to loosen the bolt. It needs not remove the bolts.
- The top cap bolt holds the fork and assembles the headset together. So after loosening the tension bolts and removing the top cap, you should hold the fork for preventing it from falling down to the ground.
- In this stage (after removing bolts, and top cap), the fork is clear to go off. But before that, you must handlebars off the steerer and stand down politely to the other end.
- Keep good support over the stem, dude. It is time to take a picture of the headset. Then remove the spacers, if you got any.
- Or, you may simply slide off the stem. It is the same thing. If you slide off the stem, then the top bearings, top/dust cap are there. But it is good to remove the spacers, dust cap, top race/compression ring, top bearings first. After that, slide the steerer out from the head tube.
- If you see lower sealed bearing is not visible, then it must be attached with the lower part head tube. A flat screwdriver or removal tool makes your work easy to pry.
- Sometimes if the headset set is super old, then a hammer or mallet of wood is required to hammer the stem/steerer down.
- Remember- take some pictures in every stage of removal.
- Now it’s time to remove the crown race and bottom sealed bearing. And, keep the fork in a safe place, or over a towel is a good choice.
Why Do You Need to Remove all the Parts Like Crown Race?
Well, it is for cleansing all the parts of the headset properly. Because every 4 to 6 months you should clean the headset for longevity and good health insurance. And, every time it is not required to replace all the components; maybe it’s need to replace a few like bearings (most of the cases), dust cap, need to greasing the parts, or may need to change the dust cap, etc. That’s why I am always ready with rubbing alcohol, waterproof grease, and clean paper towels when working on any kind of bike service on my own.
Now you have to check all the components with keen eyes. If it needs to replace the whole headset, then you must have to do the business. Why so worried, dude? You are already well-known about the headset parts, and removal procedure. It is good to put some thin coating of grease on the stem, bearings (old or new), and crown race.
- Clean the head tube (top to bottom, and inside) with the rubbing alcohol using a clean paper towel. Make sure there is no dirt, grit, or sand inside there.
- Even if you need not replace anything, do the same thing for all of the components.
- But if you need to change the bearings, then no need to clean it, right?
- And likewise, if need to overhaul the whole headset, then directly go for the next round- the installation and assemble process.
- Nonetheless, the head tube cleanse is still the best thing to do when you pull it off from the fork.
Installation and Assembly of an MTB Headset
In this stage, many of you ask- are mountain bike headset removal and installation process and tools are same or not? You should think about it simply. The installation process is the reverse step of the removal process. And the tools you need are the same.
Quick Steps of Installation a Headset:
- Before installing the new or old crown race, put some thin film of grease on it. So there will be no chance of squeaking on a slight movement.
- Many mechanics use over-greased on the bearings. But it is not the best thing to do. If you are using heavy grease on bearings, it is like a good invitation for the specks of dirt.
- When you put a new crown race on the stem, then might hear a sweet ‘click’ sound for the right installation.
- Can you remember, I asked you for taking some pictures when we were on the removal stage? Here, those pictures help you complete the procedure according to your headset type.
- Now put the bottom bearings, dust cap, spacers/washers- one after one (reverse of the removal).
- And slide the fork up inside in the head tube.
- Again, start putting back together for the upper part of the steerer- top bearings, top race/wage, compression ring, and the spacers if you got any.
- Now it’s time to put back the steerer on the fork before placing the top cap and bolts that were put off and loosening in the removal stage.
- On the installation process, the top cap should be tight enough by screwing with the top bolt but not tightening too much. That means you have to put the right tension that the spacers don’t move when you use a firm grip and attempt to turn them.
- Many mechanics or bloggers may say this much pressure or tension (Nm), you should use, but believe me, you have not to worry about it. You will get it right when you feel it right. It’s an inner feeling that will eventually grow inside of you.
- But you should maintain a 3-mm optimal distance between the top of the steerer and the stem. If the distance is less than 1-mm, then you cannot place the top bolt in the right position. And you won’t be able to pull the headset assembly together.
Now we have come to complete the assembling stage of the headset. After putting the front wheel back, tightening bolts, brake cables, it needs to align the front wheel and stem correctly. It is a kid’s job, right?
- Tighten the preload/top bolt, if it is needed. So that there is no unwanted play on the bearing.
- Align the front wheel and stem. It is fine to do the alignment on the ground if you are working with a work stand.
- Make sure, the steerer doesn’t feel so tight.
- In this stage, you might tighten the stem bolt/s with the torque wrench, if you feel to need for it.
That’s all. We are done! Is that so hard that cannot be done by yourself?
How Would You Sure About the Right Installation of a Mountain Bike Headset?
After the alignment of the steerer and front wheel and before you ride, just do a few quick checks-
- Keep the front-wheel bang on the floor to make sure there are no unwanted movements on the headset.
- Try to find out whether there is any awful sound produced or not. If you cannot hear any awful sound, then it is an indication of good installation and assembly.
- Finally, if it feels like no play, rattles- then your MTB bike is good to go.
Final Verdict
If you are in seeing my comments here, then you have already gathered knowledge about the MTB Headset, its parts, how to replace a new headset, and installation & assembly.
Now you can easily get access to your headset whenever it will be required. It is always good to service your bike within every 6-month to ensure its health. Do remember, every headset may differ in configuration but the basics are the same. And when you are willing to do it on your own for the first time, don’t forget to take pictures in the removal stage. The pictures will help you to put back things together correctly if you somehow forget something.