
Bottom brackets may not mean much to people who don’t ride bikes. So what is a Bottom bracket exactly? In bicycles, Bottom brackets (BBBs) allow riders to attach and remove their bicycles from stands without removing their shoes. They are also called “clipless” pedals since they enable riders to use their feet to pedal instead of clipping into them. And in this article, it is crucial to understand why the bottom bracket is so essential on a bicycle. Okay then, let’s start our journey together.
What Is A Bicycle Bottom Bracket And Its Structure?
Bottom brackets are bicycle components that connect the crankset to the frame, allowing the crankset to rotate independently of the structure. There are two ways to attach the Bottom bracket to the frame. It can either be threaded or it can be pressed and transmissions cannot rotate without Bottom brackets.
Bottom brackets are generally considered service items since they use bearings to allow rotation. It is possible to adjust or rebuild some designs, but modern designs are more often designed to be replaced than repaired.
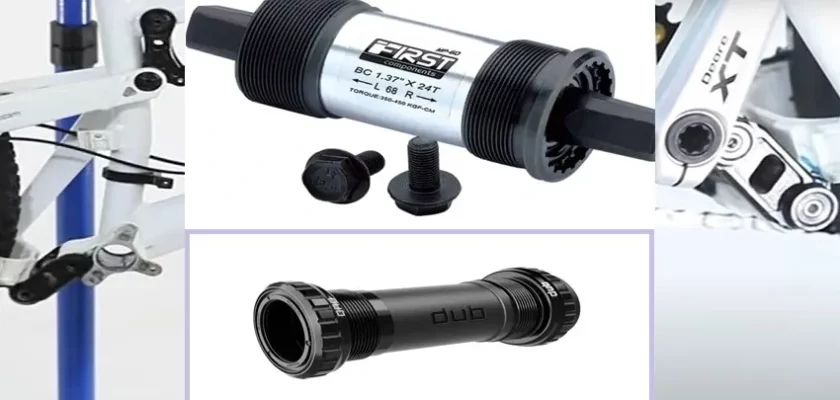
What Does A Bicycle Bottom Bracket Look Like?
The Bottom brackets are the bearings between cranks.
- Under the Bottom bracket shell, it sits inside the frame.
- An adapter or cup holds the directions within the shell.
- In addition to connecting the cranks, the spindle also connects them to the bearings.
As carbon frames became more popular and pedaling efficiency increased, press-fit Bottom brackets were created.
- To reduce the weight of the structures, smooth Bottom bracket shells were developed, and the bearings were pressed into them.
- Carbon does not respond well to having threads cut into it, and threaded metal inserts add weight.
How Many Different Types Of Bicycle Bottom Brackets Are Available?
Bottom bracket systems can be divided into two categories: threaded and press-fit.
THREADED SHELLS:
The shell of a threaded Bottom bracket has internal threads that hold the threaded parts. There may be an insert with internal threads installed into the frame shell, or the frame shell may be threaded directly at the shell.
And, various types of thread standards have been used in manufacturing Bottom bracket shells over time.
- Cups or adapters with a thread specification of 1.37″ x 24 threads per inch (approximately 34.8mm diameter) are commonly used with threaded Bottom brackets.
- “English” threading, sometimes abbreviated as ENG, is this standard’s most frequently used term.
According to English standards, the left side, which is not the drive side, is threaded with a right-hand thread and should be tightened clockwise on the drive side (right side of the bike), which is pulled counterclockwise. And, shells will have an inside diameter of approximately 33.7mm.
- In addition to its common name, this standard has several other characteristics. There are several names used in BMX bike circles, such as the BSA, the BSC, the BC, the ISO, the British, and the Euro.
- British manufacturer of bicycles, cars, and other durable goods. As well as this standard, BSC stands for British Standard Cycle. There are times when BSC is shortened to BC. It is also referred to as the ISO standard, adopted by the International Standard Organization, an international standards organization.
PRESS-FIT SHELLS:
There is no threading inside the bore of a press-fit Bottom bracket frame shell.
- In most cases, the bearing or bearing cup will be slightly larger than the frame’s bore and pressed inside the shell.
- Press fits are also known as interference fits. Interference creates pressure that holds the Bottom bracket in place.
There has been a lot of confusion over the terminology associated with press-fit Bottom brackets. There were standards based on spindle diameter, shell width, and the bore size where the press-fit occurs. In the press fit system, the bore size is preferred since it is the only consistent and most important dimension.
- A PF41 shell has an inside diameter of 41mm and a smooth bore.
- The following terms refer to the Shimano Press-Fit standard: BB86, BB89.5, BB92, BB107, BB121, BB132, and PF24.
- Bearings are press-fit into the shell, so the numbers between 86 and 132 refer to the shell’s nominal width in millimeters.
- The dust sleeves used for these Bottom brackets will vary according to the width of the bracket.
Moreover, the term ‘Press-Fit’ comes from Shimano Press-Fit, a company that developed Bottom bracket components to this standard. And, bearing adapters fitting 24mm spindles with 41mm bore frames are known as PF24.
Bottom Brackets Size Chart
In general, most Bottom brackets used the BSA standard with 68mm wide shells and 34.8mm diameters. In a few cases, frames were threaded according to the Italian standard. This standard was slightly wider and had threads on both sides, but that was all there was.
| BB Standard | Frame BB Shell Inner Diameter | Common Shell Width |
|---|---|---|
| Cannondale BB30a | 42mm | 73mm 83mm (Cannondale BB30A-83) |
| PF30 | 46mm | 61mm (Specialized OSBB/FACT)
68mm (Road) 73mm (Mountain) 83mm (Downhill) 100MM (Fat Bike) |
| BBRight (Press Fit) | 46mm | 79mm |
| Specialized OSBB Carbon (Road) | 46mm | 61mm (Road) |
Bicycle Bottom Bracket: Work And Why Is It Needed?
First of all, the Bottom Bracket allows the crankset to rotate freely and is connected to the bicycle. The working form is simply like that-
- The crankset is attached to a spindle.
- A bicycle frame consists of a seat tube, a down tube, and a chainstay connected by a Bottom bracket.
- BBs contain bearings, and if these are not maintained properly, they will stop rotating as efficiently, causing you to pedal stiffly and grittily.
- Consequently, turning the pedals becomes more difficult when your Bottom bracket is dying.
How often and where you ride determines how fast your Bottom bracket wears out depends. BBs can last years if you only ride on dry, clean roads. Nonetheless, if you regularly ride through muddy trails, all that mess will start to wear down your Bottom bracket bearing.
Are Bicycle Bottom Brackets Universal?
Though there are many different sizes and types of Bottom brackets, they are not all the same. The reasons are-
- Four widths are available with BSA Bottom brackets; 68mm, 73mm, 83mm, and 100mm.
- On the outside of this Bottom bracket, it is evident what bearings have been fitted to the bike.
There is always 68 mm space between the Bottom bracket and the frame on a BSA road bike. It is common for mountain bikes to have other sizes, especially 73 mm widths.
What Kind Of Bottom Brackets Are Used On Specialized Bicycles?
Spectacular began supplying dealers with aluminum Bottom bracket cups permanently bonded to the frame. To replace these plastic cups, a Bottom bracket with OSBB rings can be used.
How Long Do Bottom Brackets Last?
To make any generalizations, we need to consider too many factors. Bearings on a bike should last close to forever if they are adequately adjusted, and weather-related factors are taken into account.
There was a time when “primitive” steel spindles and threaded cup bottom brackets would hold up for 25-50,000 miles. And, today’s superior cartridge-bearing Bottom brackets, especially those with outboard bearings, do not seem to last as long, and many need to be replaced after 5-10 years (or even sooner).
- “If it ain’t broke, don’t fix it” is a simple rule to follow (unless you’re about to embark on a long trip).
- Keeping things properly lubricated and performing regular maintenance should extend the life of your BB by another 4,000 miles.
How Do You Know If Your Bottom Bracket Needs Replacing?
There are two sets of seals in your Bottom bracket-
- A bicycle’s bearings wear down over time like any other component.
- Gritty approaches can also be caused by water and dirt ingress over time.
Your bearings should run smoothly when you spin the cranks (with the chain dropped). But it is also essential to replace your Bottom bracket if your crank develops any ‘bad play.’ Therefore, make sure there is no side-to-side wobbling when you hold the crank arms.
Can I Change My Old Bicycle Bottom Bracket?
Yes, you can change your old bicycle, BB. Simply, spin the cranks with the chain off the smallest chainring to determine if your BB needs to be replaced or not.
- There should be no grittiness or side-to-side wobble.
- To return your BB, you should follow some steps.
9 Easy Steps For Changing And Replacing Of Bike Bottom Bracket:
Step-01: Crank Removal.
- Two pinch bolts secure the left-hand crank (the compression cap, in the end, presses the axle against the bearings while the pinch bolts hold it in place).
- Loosen the pinch bolts using a 5mm Allen key before removing the crank.
- Avoid using ball-end Allen keys if possible, as they have a funny angle and are tight.
Step-02: Decompress Bearings.
It is necessary to remove the compression cap. And you’ll need a unique tool (such as the Park Tool BBT-9, £19.99) to remove Shimano Bottom brackets. But you can also purchase separate tools.
Remember- If you lose it, you may have trouble finding spares, so don’t let it go to waste.
Step-03: Pull The Safety Catch.
You can disengage the safety catch by gently pushing it upward with a flathead screwdriver between two pinch bolts.
- The crank arm should easily slide off its spindle without exerting much force.
- Now is an excellent time to clean the safety catch if it is difficult to remove (and full of grit).
Step-04: Crank Extraction
Here, let the chain rest on the Bottom bracket shell after lifting it off the smallest chainring.
- Pull the assembly from the Bottom bracket by holding the spider (where the chainrings connect to the crank arms).
- Soft-faced mallets can be used for gentle persuasion if the object won’t budge.
- If your crank needs to be replaced, removing it will probably be challenging if the BB needs to be replaced.
Step-05: British or Italian Threads?
- Remove the Bottom bracket using the spanner part of the Bottom bracket tool.
- British BBs (marked BSA) should be removed by rotating the suitable bearing clockwise and the left anti-clockwise.
- But Italian BBs (marked ITA) should be removed by rotating both anti-clockwise.
Step-06: Clean Up The Threads.
- Using a rag and a solvent (such as Finish Line Speed Degreaser), clean the edges and threads.
- The sides of the frame must be smooth, and even so, the bearings sit flush.
- An anti-seize coat should be applied to the lines. Otherwise, it may cause your bearings to wear out quickly (within a few months). And, then the threads need to be chased and faced with the appropriate cutting tool.
Step-07: Fit The New Bearings
There should be a plastic sleeve on the new Bottom bracket.
- Attach the sleeve to the cup by pushing it into the right-hand side of the BB cup and screwing it into the frame with your fingers.
- After the bearing is finger-tight, screw in the other bearing on the other side, tighten the suitable bearing, then the left bearing, using the Bottom bracket spanner to 35-50 Nm (if you don’t have a torque wrench, this is pretty darn tight).
The BB can easily be cross-threaded here, which is a costly mistake.
- So, put the cups back in if you have trouble inserting them by hand.
- But without the tool, they should screw in about 50% of the way.
Step-08: Replace The Chainset.
Now it is time to replace the bicycle chainset.
- First, replace the chain onto the smallest chainring after pushing the right side of the chainset through the bottom bracket (don’t forget to pop the chain back over the BB).
- Make sure it turns smoothly by spinning it.
- The left arm should be positioned on the spindle that protrudes from the bottom bracket’s other side.
Step-09: Recompress
With the compression cap replaced, tighten it using the tool to barely finger tightness (0.7-1.5 Nm).
- Avoid over-tightening to prevent premature bearing wear.
- Make sure the cranks are rotating freely by spinning them. The safety catch needs to be replaced, the pinch bolts need to be tightened to 10-15Nm.
And congratulations! Finally, you have done a tremendous job by yourself at home with the help of a few tools. Now you’re ready to go!
Changing Cost Of A Bottom Bracket
The cost of parts plus $30 to $50. It is possible to get the installation done for free or for a reduced fee if you buy the parts from the shop.
Moreover, if you can do the changing and replacing of your bicycle bottom bracket by yourself, then you can easily save a few bucks. And, why not? As I have already mentioned changing and replacing the old and new bottom brackets.
Last Line Before The Closing Of Bicycle Bottom Bracket
I think it’s time to warm up to this topic. Though riders who don’t change their bicycle often may not be as concerned with Bottom brackets and gearings. Nonetheless, if you’re a frequent bicycle changer or racer, you should know about them. Moreover, you can go biking with fewer hassles if you get the right gear. Happy Cycling!