
Oh! You’ve already had an MTB, Hybrid, Commuter, or Road Bike? And, now you want to upgrade its braking performance? Then you are in a good position now. Because here we are going to discuss over upgrading or converting mechanical/cable disc brake to hydraulic disc brake.
Not only that, but we will also put rays over the ins-out and the upgrading kits we may need to do this job done at home easily. And, is it really worth upgrading to a hydraulic brake? Keep remembering, in this article, we will talk about the Disc braking system, its type, convert procedure, installation, and many more steps related to upgrading the disc brake. So if you have another kind of braking system, then it is not going to help you too much, but the principal. That means you will get many of your answers about upgrading your brake system to Hydraulic.
Benefits of Disc Brakes
As we are talking about the disc brake upgrading, so take a glimpse over the beneficiary of disc braking mechanism on MTB or any bike-
- It is more powerful than V-brakes or cantilevers.
- Its overall performance and manufacturing update give it more versatility to fit with any weather condition. That means disc brakes perform far better than the rim braking design whether it is a wet, muddy, or sloppy trail.
- The design and compatibility of the disc brake prove that it is a perfect braking system for off-road biking.
- These modern and progressive mechanisms feel alike more power on braking without losing control.
- In short, the power, versatility, off-road quality, and progression make any biker confident when they are going to hit the road in any weather condition.
In a disc braking system 3 types of pads are used- sintered (metallic), resin (organic), and semi-sintered/metallic or semi-organic. And, this Disc brake comes into two different versions that are used on our modern bikes-
Today we are going to figure out these topics actually- can you change mechanical brakes to hydraulic? Or, is it worth upgrading the Mechanical Disc Brake to Hydraulic?
Can You Upgrade Mechanical Disc Brakes to Hydraulic Brakes?
Yes, it is possible to upgrade or convert mechanical to hydraulic disc brake. But every time you can’t just connect a mechanical cable to the hydraulic system. You may need to change your rotors or shifters, or brake levers (brifters) designed for the hydraulic systems to achieve a better combination and performance.
This day, almost every hybrid, mountain bike, even on a road bike feature the Hydraulic braking mechanism for its upgrading modulation and stopping power. But if you haven’t such kind of bike or a moderate version, then you may think to upgrade it into hydraulic. And, so that here we are to make your decision easier by explaining the facts and circumstances.
What Are The Advantages of Upgrading Mechanical Disc Brakes to Hydraulic?
So, you have a mechanical disc brake on your MTB, Hybrid bike, Road Bike, or Commuter, and you are sure about converting it into Hydraulic? The main reason for this upgrading happens due to braking performance, stability, higher progression with quality control over the bike. But the upgrading cost should be cheaper as far it could be. Let’s see some advantages a bike would enjoy if any biker converts to hydraulic from mechanical disc brake.
Maintenance and Elite Feeling: In a Hydraulic system, the braking mechanism works through “fluid” which tends not to compress. And it feels more precise than a cable-actuated mechanical brake. So, the difference is- mechanical’s medium is cable-operated and hydraulic’s is fluid. And, the maintenance cost of hydraulic is almost zero. You just need to change the fluid over a certain period.
- But mechanical calipers reduced maintenance requirements.
Heat-Induced Fade: As we all know, almost all types of brakes suffer heat-induced fade. But in a hydraulic system, the sufferings percentage is almost 10% compare to others.
Higher Stopping and Stooping Power: The main advantage of upgrading to a hydraulic system is its stopping and stooping power on the off-road trail. The hydraulic disc brake is more sensitive, efficient, and reliable rather than anyone else in this field.
- But hydraulic brake’s adjustment is slightly more complex than the mechanical brake.
Price: Many mechanics think like my partner Mike is that Hydraulic brakes cost high. But it is not true in every situation at all. Even in some cases, hydraulic is cheaper than mechanical brake or the same.
Weight: Hydraulic is much lighter than mechanical braking systems.
Efficiency and Compatibility: One of the main reasons to opt for hydraulic is- it is compatible and reliable in every weather condition, where you can’t think it with the mechanical brake.
Easy to Replace: If you ever need to replace your hydraulic brake, it is super easy.
Modern Day’s Design: As I told you earlier, almost every modern bike manufacturer design their bike compatible with hydraulic brake. The best example is MTB. But also in road bikes, they are increasing their rims 28 to 30 mm which is more compatible with a hydraulic system rather than a mechanical disc brake.
Applying Force: You just need a gentle push on a hydraulic brake to stop your sweetie, whereas in a mechanical brake you need to produce more pressure to gain the same force.
How To Upgrade Mechanical Disc Brakes to Hydraulic?
When you are going to upgrade your mechanical brake to Hydraulic at home (DIY Job), you will need some tools –
- Open-ended wrench.
- Set of Allen keys/wrench, or HEX socket.
- Rubbing Alcohol for multipurpose uses.
- Paper Towel for cleansing.
- A flat-bladed screwdriver.
So, let’s start the upgrading procedure. That is remove the old mechanical braking system, and replace & install with hydraulic one by following some simple steps.
Removing Mechanical Brake:
- First, remove the front/rear wheel with an open-ended wrench or something compatible with this.
- Then remove the front or rear caliper of the old mechanical disc brake with a 5-mm (almost all the cases) Allen wrench or HEX screw.
- If there is any screw on a cable to opt-out, then do it with the set of Allen keys.
- Then you need to remove the grip for replacing the brake lever or shifters. Use a little bit of rubbing alcohol under the grip for working it as a lubricant. And you will need a small Allen key to help you squirt the grip.
- If there is any clamp bolt, loosen it.
- Now slide off the old brake lever for installing the new hydraulic one. No worry dude, every modern hydraulic brake comes with its new lever or shifters/brifters.
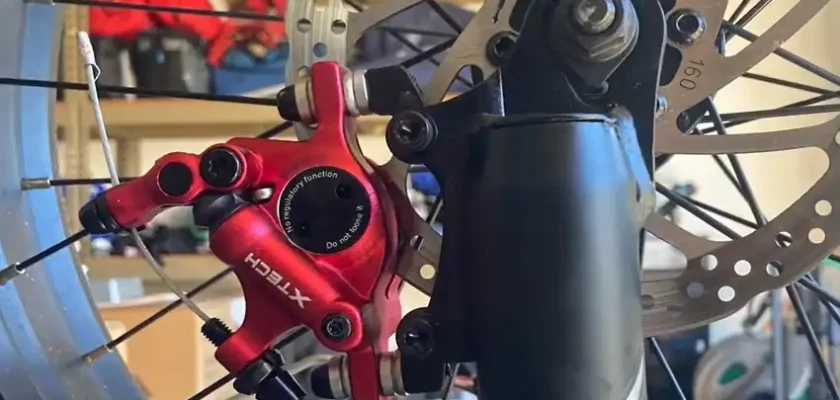
Install Hydraulic System:
- After removing the old lever, put on the new one and adjust the angle as per your comfort and requirement.
- Then adjust the calipers with the new system. The manufacturer guide will help you if you face some problems in the fitting.
- Now adjust the cable line, and screw it with the baseline of your bike braking system.
Before re-installing the wheel, use some rubbing alcohol on the rotors to clean dirt, rag, or oil. And use a clean paper towel, then let it dry.
- Now, if the brake pads are pushed together, then you have to apart them. So that you can put the rotor between them perfectly. A flat-bladed screwdriver or similar plastic tool, or pad removal (generally, it comes with the new braking package) will help you do the job done.
- I think you have already known how to install disc (hydraulic) brake pads And if you somehow using any other brake pads rather than organic or resin pads, then my recommendation is to replace the pads as your schedule match. It is not necessary to do it now. The main reason is- resin pads work the best in hydraulic braking mechanisms.
- After re-installing the rotor between the brake pads, you have to remount the wheel. And make sure that the rotor slides nice and easy into the caliper.
- Again make sure that the wheel is fully seated into the dropouts. So that it looks nice and straight.
- Now it’s time to tighten the caliper and other screw-like clamp bolts. Yes, it is the reverse step of removal.
Remember– keep the brake lever compressed until the caliper is fully tightened in the proper place.
- At last, use the torque wrench to make sure about the tightening.
Check The Correct Installation:
After replacing, installing, and tightening all the things, you have come to the very last stage of upgrading your bike brake to hydraulic. Now spin the wheel and hit the brake. If the installation is correct, you will get it on your own, your brake will say it to you.
At last, tighten all zip ties on your braking system and clip them off kind of turned them. However, the removal, replacement, and installation of mechanical to a hydraulic system for front and rear braking is the same.
Wow! Now you get your new hydraulic brakes with no wrinkles.
Note that: As long as you don’t have any big compatibility issues, don’t focus too much on the rotors. Maybe the 100 to $200 rotors make a difference but for budget, stick with what you got.
How Do You Choose the Best Hydraulic Brakes for Your Bike?
When you hit on a rough floor or want to get top-notch performance in braking, then there is no way rather than choose the Hydraulic brakes. But you have to pursue the best one, when you are going to convert it, right? So, now we are starting a discussion over that matter in the following section.
- Power: Some brakes come with two pistons, some come with four. Usually, 4-pistons provide more braking power but it’s having some extra weight. So what you need, matters here.
- Rotor Size: Check out the manufacturer’s design, features, and most importantly- is that compatible with your disc rotors (size) or not?
- Rotor Construction Material: Check out the construction material of rotors, if you have to replace the rotor, or it comes within the new package. The best rotors are made of stainless steel, heat-resistant with a two-piece design. You may find an aluminum carrier wrapping the rotor. But it cost high. So choose according to your pocket, need, and requirement.
- Brake Pad Material: Most hydraulic brake manufacturers use resin aka organic pads and metallic Organic braking pads are the best for hydraulic disc brakes. But it is quite a bit costly and has less longevity than metallic pads.
- Performance: Before purchasing a hydraulic brake, check out the performance tag which indicates how much it is reliable in all types of weather conditions. Because you convert hydraulic brake for the best braking feel and persistence.
- Braking Power: Check out the braking power of the new brake. You have a lot of options out there in the market as per your need and consistency.
- Lever or Reach Adjustment: This is the most important fact when you choose a brake for your MTB, road bike, or commuter. The perfect lever spacing from the bar helps you to reach your hand size. Some manufacturers offer free-stroke or bite point adjustment. This bite adjustment doesn’t move closer to the rotor. It can see either tool-free or tool-driven.
- Brake Fluid: As we know hydraulic mechanisms are run by fluid to drive their pistons. And, there are two kinds of fluid that are generally used in the hydraulic braking system- DOT fluid or Mineral Oil. DOT fluid performs better in terms of water absorption. But it is bad for skin and bike paint, also requires sound maintenance.
No worry, both are effective and perform well. Whatever fluid you choose, you need to change it regularly to get the top-level performance and feel.
- Some Additional Facts: You may also look for an adapter depending on your fork/frame and rotor size. Some companies offer them within a package, but generally, adapters are sold separately.
You may also check whether they are offering pad removal or not. And, look for the preferable shifter mount (clamp) as per your need.
There are also two small components called olive and insert which help to fasten the hose into the lever. Whatever almost every company give the spacers with the box.
- What I have just told here is not mandatory to choose the best one.
- Color: Yes, nowadays hydraulic disc brakes come in different colors in the market. So if you have any weakness about your bike brake color, this may be a fact to consider.
- Price: At last, check out the rotor size, calipers, compatibility with your bike, and other facts- it’s time to finalize the persistent hydraulic brake. Here, you should go for a budget-friendly Brake.
Furthermore, there are two types of Hydraulic Brakes based on operation method-
- Spring Actuation/Engage
- Spring Return/Disengage
But these are not mandatory fats when we choose a bike brake. So, I didn’t add it up there.
Some of The Best Hydraulic Disc Brake For Bikes
Is It Worth Upgrading to Hydraulic Disc Brakes?
I think you got all of the benefits of a disc brake, especially the hydraulic one. Let’s make the long history short. Undoubtedly, hydraulic brakes are superior to mechanical in terms of disc braking systems. But hydraulic is a bit more expensive than metallic if you want to buy the best and most elegant hydraulic brake on the market. Otherwise, the price is almost the same.
Today most of the MTB manufacturers from mid to high end, use hydraulic disc brakes on their bikes. Because it is the top choice for off-road biking and persistent performer in muddy, slippy, foggy, or any kind of weather situation. But if you need to shift the rotors for upgrading to hydraulic, then it’s may not be a wise decision so far. Because the best rotors are cost high.
Final Words
In this section, there is not much to say but recall the main things. Because we have already discussed almost everything you need to upgrade your mechanical disc brake to hydraulic, how to choose the best hydraulic disc brake, its types, benefits, and worth.
In a word, if you want to get the best braking system, an off-road biker, require a consistent reliable performing brake, need more braking power with a gentle push only, and super control with efficiency – then it is good to convert into a hydraulic disc brake from mechanical.