
A few days ago, my Bike workshop partner Mike had a bad experience due to his Sweetie. I mean his very own Mountain bike. He was almost about to hit a big palm tree beside the road because of the bike’s brake maintenance issue. And, after the incident, we both figure out the problems and fix the braking issues of his Shimano brake pads. So for today, I have no special choice to write rather than all kinds of brake types, changing the brake pads and other components of the braking system of a Mountain Bike.
But believe me, this is not the end. It’s just the beginning to share my keen experience with MTB with you, Guys. Moreover in this article, you will get top-notch tips over the MTB Brake system, adjusting braking pads, and servicing your bike brake. This means, from servicing to installing brake pads that is all you want to know. Alright then, just stay tuned from the starting to the end.
Understanding Braking Mechanism And Pads Types
Before choosing which kind of pads or brake is perfect for your MTB bike, it needs to figure out the types of brake on an MTB or Road Bike braking system. This knowledge is also helpful when you try to remove/put off, or service your Road/Hybrid/MTB brake/braking pads. That means after completing this session you will aware of what type of brakes your bike has.
Brake Types:
From the ancient time to the modern era, there are three kinds of braking systems which are used generously based on applying braking force-
- Drum Brake: It is the first braking system in the history of bikes. This mechanism is nothing but a metal drum attached to the wheel as the name indicates. Drum brake doesn’t use this day anymore. So, that’s it for now.
- Rim Brak: This is a modern version of the drum brake and a traditional braking system which is still found sometimes on an MTB bike. In the rim braking mechanism, the braking force directly applies to the rims. And there are two main types of Rim Brake- a) Caliper Brakes, and b) Cantilever Brakes.
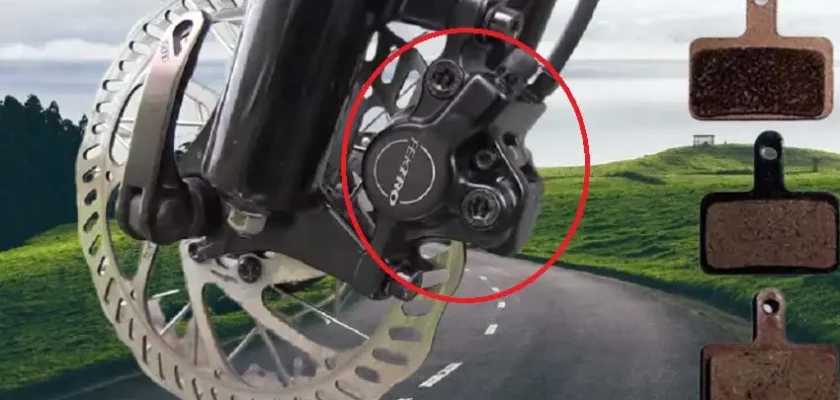
- Disc Brake: It is the common form of the mountain bike braking system. In this braking mechanism, the force applies to a disc that is mounted on the hub of the wheel.
The majority of MTB and Hybrid bikers use caliper braking mechanisms with the V-type or V-shaped brake.
But this is not the end. There are also two different criteria of mountain bike brake that can also help you to understand when you are going to adjust the new brake (Rim/Disc/V-type) on your MTB-
- Mechanical – Cable-Accelerated, which means the piston is activated by wire cables.
- Hydraulic – in which piston is activated by hydraulic fluid in a sealed hose.
In Disc brakes, both (mechanical & hydraulic) types are used widely. But the Hydraulic braking system is the most popular type in MTB. On the other hand, hydraulic rim brake is rare to watch (especially road cycling) on the Rim Braking mechanism, whereas cable-reign is supreme here.
Brake Pads Types:
In the braking system, pads are the most crucial components. Also, it is one of the items of braking mechanism which need to be replaced over time. Generally, brake pads come in three types depending on the compounds they are made of-
- Metallic or Sintered Pads: This type of brake pad is made of sintered steel with no synthetic additives.
- Organic or Resin Pads: Manufacturers of Organic pads use high-density ceramic and softer compounds than sintered pads. It is made of up to 4 ingredients- Carbon, Kevlar, Rubber, and glass.
- Semi-Metallic Pads: It is the middle ground between metallic and resin pads. Semi-metallic pads are made from a combination of synthetics and different proportions of flaked metals.
So, are mountain bike pads universal? Actually, yes. They may differ in material, and slightly in size, or diameter. But this does not create any larger significance that we can declare it as ‘non-universal’.
Is It Easy To Replace Mountain Bike Brakes?
Yeah, absolutely anyone with a basic knowledge of the bike braking system can do this job at home easily. Because replacing brake pads on a disc brake system doesn’t have to be difficult. You just need a few tools to get prepared-
- A new brake set, or brake pads
- Set of Allen Keys
- Flat Screw Driver/Pad Spreader/Spacer
- A Torque wrench- to secure the tightening of pin bolts
- Open-Headed Wrench- for putting off the wheel
- Gloves
- Paper Cloth
- Rubbing Alcohol or Degreasing Spray
Well, today Disc brake is popular in terms of mountain bike brakes. And Disc Braking mechanism consists of the cables, caliper, disc rotor, brake pads where the mechanism is accelerated via hydraulic or mechanical approach. Every time it need not be required to replace the whole braking system aka caliper, rotor disc. But most of the time when the brake feels squeaky or rubbed, the main problem is with the brake pads. So here we are going to talk about fixing MTB disc brake pads, the most common and popular MTB braking style.
Changing (Removing, Replacing, and Re-Installing) of MTB Brake Pads – Step by Step
Brakes are arguably the most important component on the bike. It is stopping us from hitting any trees and controlling the Overspeed. So it’s important that they work well in a way which can meet our personal preferences.
Before starting the main topic, let’s be clear about a thing first. There is no noticeable difference between the front and back brake pads. The only difference is that the rear brakes don’t need to be as powerful as the front brakes.
Choosing The Brake Pads:
I hope, you have already purchased the right pads that would suit your MTB bike. Furthermore, I have already discussed the brake types briefly so that buying the correct new pads for your system becomes easier.
However, you can also check on online platforms like Amazon that look identical in shape to your old pads. If still in hesitation, then the simple solution is- go to a nearby bike repairing station with your bike, and ask for help. They will definitely help you to figure out the right pads for your bike.
Removing Disc Brake Pads:
Precaution first! What I mean, wear repairing gloves on both hands. So that you cannot able to contaminate the braking system anyhow. And, it also ensures your safety.
Step- 1: Put your mountain bike in a repair stand. If you have no repair stand, then no need to worry dude. Just flip your bike upside down and balance it on the ground. Then, remove the wheel with an adjustable or open-headed wrench.
Step- 2: Now you will see the common brake caliper design. There you may see a retaining pin or cotter pin. After that, remove the clip from the end of the pin and unscrew the retaining pin bolt with an appropriate Allen key or Torx Screwdriver. For the cotter design, bend the end straight.
Step- 3: In this stage, you can use a flat screwdriver in between the pads for loosening the adjuster to pull off the old junky pads. Make sure to place the screwdriver in the center of the caliper. Here you can see two scenarios depending on your bike manufacturer’s design. One is- brake pads attached with a spring that will be removed with the pads. And another one uses a magnet to hold the pads against the piston/s.
Note that, every new MTB brake pad comes with a spring. But it is a wise decision to not trash the old springs. Because if anyhow the new spring doesn’t fit, then the old one will be the savior.
However, make the long history short for the second (magnet) scenario-
- If it requires pulling off the spring, then do it.
- Then watch out for the spring mechanism where it is attached with. If the spring protrudes out the top, then you have to remove the spring first and after that take off the pads from the bottom.
- If your brake design doesn’t have a protruding spring, or a retaining pin, then remove the outer pad first, as it is sometimes impossible to remove the inner pad first.
And, for all the brake designs- if the pads are getting stuck, loosen the adjuster. Moreover, if the design uses a clip on the pad to hold it in place, then you may put some force to remove the clipped pads.
Remember – Do not squeeze the brake levers during this process. Otherwise, the piston will pop back out and the new brake pads won’t fit in the cage.
Now the last thing for a magnet-based system of taking off the old pads is to grab the pad, move it inwards, and pull. After that remove the spring as well.
That’s all for the removal of Disc Brake Pads.
Install New Disc Brake Pads
Before putting back the new brake pads on your MTB brake system, use degreaser spray into the middle of the caliper (if needed, then put off the rotor disc also) to clean the contaminant materials, dirt & dust. Yes, a clean paper cloth/towel will help you in this cleansing process.
In short, re-install is the reverse of the removal process of removing the brake pads steps.
Alignment of Pistons:
In this example, you need to fully retract the pistons before fixing the new pads. This makes room for the extra pad material on the new pads.
- For hydraulic calipers, you’ll just press the pistons back in using a tool like the PP-1.2, a tire lever, or a cone wrench.
- For mechanical calipers, turn the adjusters counter-clockwise until it stops.
Note That: Some calipers have tool-free adjustment, and some require tools. Some calipers have two adjusters, and some have one.
Put New Pads on the Braking System:
It is always good to use new brake pads of the same style or same brand, which make you get rid of some unnecessary problems.
- Now the pistons are fully retracted, so you can begin pad installation. As I have mentioned earlier, the installation of the new pad is basically the opposite of removal.
- In this example, magnets hold the pads against the pistons. So you need to install the inner pad first, then install the outer pad.
- The example that I have chosen to explain the whole process uses magnets. But it doesn’t matter which pad you install first, it has a retaining pin.
- This style contains a clip on the pad to hold it in place. So that it may take some force to install the clipped pads.
Quick Reminder: Although pad removal and installation may slightly differ from bike to bike due to the specific manufacturer or brake style, the principle is the same.
Final Alignment of Spring, Brake Pads with the Calipers and Wheel
On this model, there is a spring to keep the pads pressed against the pistons. But for other styles, springs may need to be oriented in the correct direction. Okay, let’s back to our last job.
- After putting the pads in the spring, we need to line up the pads appropriately. And we may have to use a bit of force to get them to click in. This procedure can require several attempts to get the pads and springs properly aligned.
A Brief History of Installing New Pads
- In our example, the pads go in first, and then the spring goes in.
- Here, we install the pads, then threaded the retaining pin, and after that the pin clip.
- This style uses a cotter pin, so we need to make sure to give the cotter pin a good bend.
- For both mechanical and hydraulic calipers, you have to re-install the wheel and make sure it is properly seated.
- For mechanical disc brakes, you have to align the caliper after setup the new brake pads.
- For hydraulic disc brakes, you may have to pump the lever which helps to move the pistons and the new pads in the proper position.
How Do We Ensure About Correct MTB Brake Installation?
After doing all the steps to the journey towards changing the sweet beast’s whole brake system or only the disc brake pads, it’s time to be sure about the right replacement. For that, any DIY mountain biker should rotate the wheel and inspect the pads for right alignment. Also, you should backlight the caliper to make it easier to see. Moreover, it requires that the disc is running straight.
Now it’s time to squeeze the brake lever. It might take a few pumps before the pads bite.
- If pads don’t grip the rotor after repeated pumps. (Note: you will need to bleed the brakes if you are a Hydraulic Man)
- If there is no rubbing, then it’s good to go for a test drive.
- If there is rubbing, it is likely an alignment issue.
The newly installed pads may wiggle a little bit in spite of the Sureshot replacement. But be cool Super DIY project dude, you have done a tremendous job that everyone can’t. Because after installing new pads, a bit of wriggling is normal. Now happy?
However, it’s good to acquire knowledge about the alignment of Hydraulic Disc brakes and Mechanical Disc brakes.
Congratulations! At last, the new pads are installed on your Mechanical/Hydraulic MTB Disc braking mechanism accurately. And you’re ready to shoot the moon.
When Should I Replace My Mountain Bike Brakes Or Pads?
Many beginners and professional mountain bikers say that Brake Pads need to be replaced if they are worn out, or contaminated. Or, in some cases, anybody just wants a change of pad material for high-performance reasons.
A Pro-Biker with experience can just look at the pads whether they need to be replaced or not.
Generally, the pad material must be at least 1 millimeter thick. So we recommend replacing your brake pads when there is 0.5mm or less of braking material remaining whether the pads are worn out/contaminated or not. Otherwise, you might have the experience like my workshop partner, Mike.
- By stacking 2 business cards, you can create a makeshift feeler gauge that is approximately 0.5 mm thick. Or, you can use a Caliper for perfect measurement.
Furthermore, after checking the brake system of your bike-
- if the pads are okay, then it may be time to replace the wheel, brake caliper, cables, pistons, or disc rotor.
- If the disc pads are not okay, then follow the changing MTB brake pads steps that are already illustrated in the above passage.
Which Brakes And Pads Are Best for Mountain Bikes? Disc, Hydraulic, or Drum Brakes? Organic, Metallic, or Semi-Metallic Pads?
First, let’s talk about the pad materials.
Metallic Brake Pad is well known for the long-lasting term in rough conditions like heavy winter, or messy mucky conditions. But Metallic brake needs extensive force power for braking which also creates extra heat through brake pads. And, it also makes noisy or squeaky sounds.
In contrast, Organic Brake Pad is famous for better stooping power and heat dissipation. But it can wear out more quickly in wet and gritty conditions. So Resin pads are not a good choice if you are doing lots of downhills, or you have a love for e-bikes.
And, the Semi-Metallic Brake Pad stands in the middle of metallic and organic pads. It is not noisy as Metallic nor quiet as Organic pads. Moreover, it has neither controlling power as a resin pad nor longevity as a sintered pad. In a word, it is like a middleman in every comparison criteria among these 3 brake pads.
- So, what kind of pad material you choose totally depends on your preferences- like riding area, fitting basics, seasons, stooping power, and braking habit.
Now come to the point of the braking force mechanism where disc brakes carry two main advantages over v-brakes or cantilevers. It also offers great improvements in terms of pure performance over their rim-brake rivals. In this day of the MTB braking mechanism, the Disc brake style outranks the Rim brake style a long ago.
Finally, comparing all the facts- Hydraulic Disc brakes with V-shaped (Pads- metallic, or resin materials) are vastly used and popular among Mountain bikers. So that for now, we can say- it is the best for the MTB Brake system.
How Long Do MTB Brake Pads Last?
Truthfully, there is no definite or exact answer to this query. The longevity of your MTB brake pads depends on some facts like body weight, the terrain you are riding, weather conditions, frequency of your riding, and braking habit.
All I could is that give you a rough guess. But before that, I would like to recommend that a biker must perform a sound inspection of their bike brake after riding every 300 miles (average). So that a biker can be well aware of his/her MTB’s brake health.
Okay, I think-
- Resin disc (organic) brake pads can last up to an average of between 500 to 700 miles.
- In contrast, metallic disc brake pads can last up to 900 to 1100 miles (Average).
- On the other hand, Semi-Metallic Brake pads can last up to between 550 to 900 miles on average.
To Wrap Up
No doubt, if you are reading this, then you have already earned a sharp knowledge about brake types, changing MTB brake pads, and everything that is related to this topic. The article maybe a little longer than my other blog post, but I believe that every bit of my experience must help you somewhere in maintaining your MTB Brake System. And, now you can change, adjust or fix your brake problems on your own.
At the very end. I want to tell you Bike Maintenance is a perfect blend of simplicity and complexity. But despite all of this, everything about installing an MTB brake is simple enough to make sense. Moreover, there are still a lot of moving parts that we all need to work together to achieve optimal performance of your mountain bike.