

Greetings, my fellow cyclist! I’ll explain why it’s a good idea to put some sealant on your flat tires. Get your helmet on and get ready for a wild ride through the wonderful world of tubeless tires!
So, imagine this: you’re riding down the roughest trail, feeling the wind in your hair (or helmet, safety first, my friend), when suddenly, BAM! You hit a sharp rock or a branch with sharp thorns. Oh no, there’s a hole! Now, if you had regular tubes in your tires, you’d be stuck on the side of the road, pulling out your tire levers and cursing your luck.
But don’t worry, friend! Tubeless tires and sealant will save the day! Sealant is like a magic potion that you pour into your flat tires. It’s a sticky, gooey material made to fix those annoying holes on the go. I can tell you that it works perfectly!
When you add sealant to your tubeless setup, it fills the inside of the tire and goes to work as soon as the tire gets a hole. The sealant rushes in and fills the hole, making a seal that keeps air out. It’s like your tires have their own superhero guardian angel. Puncture? No problemo!
Is Adding Sealant To Your Tubeless Tires Hard?
Nah, adding sealant to tubeless bike tires is not a hard process at all! In fact, it’s pretty easy and won’t take up too much of your time. Once you know how to do it, you’ll be a pro at adding sealer.
Before you start, the most important thing to do is to get the right tools and supplies. Once you have everything you need, you just need to follow a few easy steps. My article will make it easy peasy.
Tools To Add Sealant To Tubeless Tires
First things first, we have to make sure that we have all of the necessary equipment and supplies. The rundown is as follows:
Tubeless sealant: Invest in a high-quality sealant that is compatible with the brand of tire you ride on and the way you ride it. You might be interested in fantastic alternatives such as Stan’s NoTubes, Orange Seal, or Continental Revo Sealant. But I have my top 3. Let me show you.
1. Stan’s NoTubes Tire Sealant
Stopping flat tires is important, right? No one wants to have to stop on the side of the road to fix a flat tire. This Sealant will help you out. It does its job and seals holes as big as 1/4″ (6.5 mm). That’s some real protection against getting holes!
This Sealant has a low thickness, which is another cool thing. That might sound fancy, but what it really means is that it won’t freeze up on you, even when it’s -20° F (-28° C) outside. So, this sealant has you covered whether you’re riding in cold weather or just want peace of mind during winter rides.
Also, this stuff stays wet in your tire for at least 2–7 months, giving you long-term care and making sure you can ride whenever you want.
2. Orange Seal – Endurance Formula Tubeless Bike Tire Sealant
This long-lasting sealant is perfect for various types of riding, including mountain biking, road cycling, gravel riding, cyclocross, and e-bike adventures. This sealant lets you enjoy your ride instead of fixing it. Riders prefer it due to its durability and adaptability.
It seals punctures fast and bonds to your tire’s inner surface. Its unique rubber composition seals the entire bead/rim contact surface from the inside out. This sealer seals 1/4″ holes and 3/4″ cuts in any weather. It even performs well in frigid temperatures as low as 11 degrees Fahrenheit, providing peace of mind and safety in any weather.
3. FiberLink Pro Latex Sealant
This sealant is the best for long-lasting seals. Kevlar-enhanced FiberLink Technology makes it excellent for tough terrain and demanding races. Its thin consistency minimizes air loss in races where every bit of air counts.
The sealant is easy to apply and smells mild. For road tires, use 2 to 3 ounces of sealant, 3 to 4 ounces for CX, gravel, 26″, or 27.5″ tires, 4 to 5 ounces for 29″ tires, and 5 to 6 (or 7 to 8 ounces) for 29″+ or fat tires.
The suggested sealant amount for road tires is 2 to 3 ounces, 3 to 4 ounces for CX, gravel, 26″, or 27.5″ tires, 4 to 5 ounces for 29″ tires, and 5 to 6 (or 7 to 8 ounces) for 29″+ or fat tires.
Valve core removal tool: This nifty tool will help you remove the valve core for the sealant injection. Let me help you with this.
1. Park Tool Valve Core Remover
The Park Tool Valve Core Remover is a useful tool that makes it easy to add fluid to tubeless tires. Its magic comes from the fact that it is made to take the valve core off of the valve stem.
To put sealant in a tire, you have to open the valve core and pour the sealant in. Without the Valve Core Remover, you’d have to use pliers or some other homemade tool, which can be a pain and could damage the valve core.
The Park Tool Valve Core Remover is also great because it works with both Presta and Schrader valves. So, you can use this tool with either a road bike with Presta valves or a mountain bike with Schrader valves.
Sealant injector or syringe: You’ll need this bad boy to inject the sealant into the tire through the valve stem. You can do this job with Park Tool TSI-1 Tubeless Sealant Injector.
1. Park Tool TSI-1 Tubeless Sealant Injector
This syringe-like gadget is easy to operate. Injecting sealant through the valve stem simplifies sealing tubeless tires on your car. For tire punctures and best performance, the syringe body has a visible scale for accurate sealant control. The syringe’s 100-cc (3.5-oz) volume reduces refills.
The syringe body has a scale for precise sealant measuring and control for tire repair and performance optimization. With its wide capacity of up to 100 ml (3.5 oz), the syringe can carry a considerable amount of sealant, minimizing the frequency of refills.
Air compressor or floor pump: You gotta have some air power to inflate those tires once the sealant is in. Park Tool has the best option for this.
1. Park Tool PFP-8 Home Mechanic Floor Pump
This pump has a combination head with a thumb lock that is very useful. Why does that matter? Well, it means that you don’t have to change any of the parts inside to make it work with Presta, Schrader, or Dunlop valves.No matter what kind of valve your tubeless tires have, it’s easy to attach it to them.
The steel barrel is another great thing about this. This makes sure that you can easily and quickly put air into your tires. You won’t have to fight or feel like you’re about to sweat anymore. The way the pump is made is meant to make your life easy.
It has a steel base that is very stable and made to last. It has extra-large foot pads, so you can be sure it won’t move around while you’re putting air into your tires. This is very important because you need a strong base to build on, right?
Tire levers: Just in case you need to remove the tire from the rim. Better safe than sorry!
1. Park Tool 2 Carded Tire Lever Set
The Park Tool 2 Carded Tire Lever Set is the ultimate choice for tire removal. Three versatile tire levers—TL-1.2, TL-4.2, and TL-6.2—are included. Each lever helps remove tires in different situations.
The TL-1.2 is a thin, strong lever for tire removal in tight spaces. Multi-lever spoke hooks are included. The TL-4.2’s ergonomic shape and wide, flat tip emphasize comfort and use. A spoke hook adds versatility.
Finally, the TL-6.2 is strong enough to handle the toughest tire beads. Its smooth operation and slipperier material secure the tire bead. The Park Tool 2 Carded Tire Lever Set is perfect for any tire removal task.
That’s all you need, buddy! Now I will make you a pro to do the job. You just need to read carefully.
Process To Add Sealant To Tubeless Tires
Now, I will guide you through the process of adding sealant to tubeless tires, ensuring a hassle-free and safe riding experience.
Step 1: Preparation
Get your bike in position: Find a safe place for your bike, like a strong bike stand or by turning it over. So, you’ll have an easy time getting to the wheels.
Remove the wheel (optional): If you want some extra room to work, go ahead and take that wheel off the frame. It’s totally up to you!
Deflate the tire: Take off the valve cap and give the tire a good squeeze to let air out. With the valve core removal tool, press down on the valve core to let all the air out. Psshhhh!
Remove the valve core: Time to get that core out of there! Use the tool for removing the valve core to unscrew and pull out the valve core. For the sealant to go in, there needs to be a clear way.
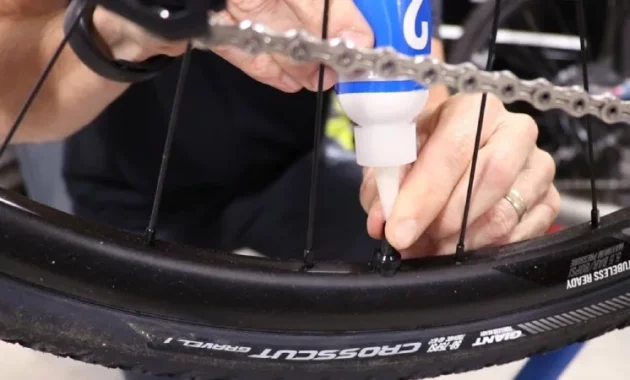
Step 2: Adding Sealant
Shake the bottle: Shake it, baby! Give that bottle of sealant a good shake to make sure all the good stuff is mixed in well.
Insert the injector: Now, get your sealant injector or syringe and put it on the valve stem firmly. We don’t want things to get out, right?
Inject the sealant: Slowly squeeze the injector to put the proper amount of sealant in the tire. Check the sealant’s directions to find out how much you need. We want that lubricant to cover the tire with love.
Remove the injector and reinstall the valve core: Carefully pull out the sealant syringe and put the valve core back in. Make sure it’s really tight so there are no sneaky air leaks.
Step 3: Tire Reinstallation and Inflation
Put the tire back on. Make sure the tire bead is snugly set in the rim channel when you put the tire back on the rim like a pro. If you need to use wheel tools, be careful not to hurt the wheel or tire.
Pump it up: Grab your trusty air compressor or floor pump and start inflating that tire. Pay attention to the recommended pressure indicated on the tire sidewall or in the manufacturer’s specs. We wanna get it just right!
Check for leaks: Once the tire is filled, it’s time to check for leaks. Apply a soapy water solution to the surface of the tire and watch for bubbles. If you see bubbles, you have a break that needs to be fixed.
So there you go, my friend! You’ve done a good job of putting sealant on your tubeless tires. Now, spin the tire to spread the sealant equally, and you’re ready to ride again.
Final Words
Adding sealant to tubeless tires is an important maintenance job that keeps them working well and protects them from punctures. By following the detailed instructions, you can add sealant to your tubeless tires with confidence, extend their life, and enjoy a smooth, worry-free ride.
To keep your tubeless tires in good shape, make sure to check the sealant levels often, look for holes in the tire, and do regular maintenance.
Happy Biking!