
Looking to perfect your biking experience? Look no further than learning how to adjust cable disc brakes on a bicycle. Whether you’re a seasoned cyclist or just starting out, mastering this skill is essential for ensuring optimal brake performance and safety on your rides.
Imagine effortlessly gliding along the roads, feeling the wind in your hair, and knowing that your brakes are finely tuned and ready to respond at a moment’s notice. With the right knowledge and a few simple tools, you can achieve just that. So, let’s dive in and explore the ins and outs of adjusting cable disc brakes on a bicycle.
In this blog article, we’ll guide you through the process step by step, so you can confidently tackle any necessary adjustments yourself.
Mastering Cable Disc Brake Adjustments
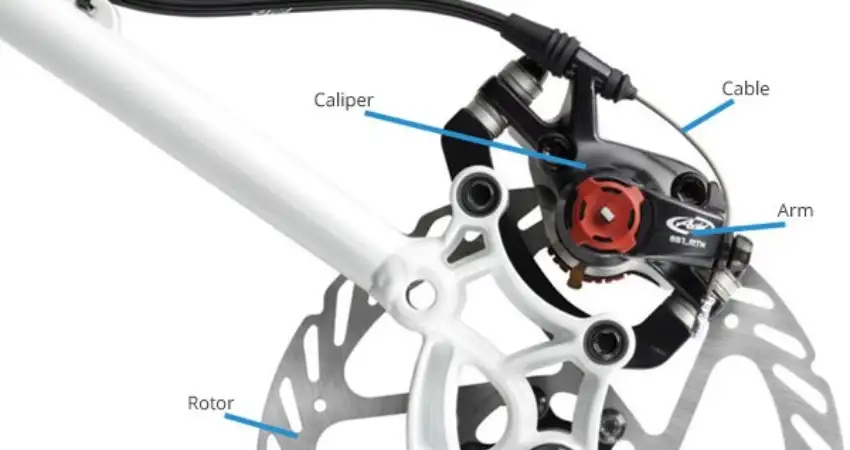
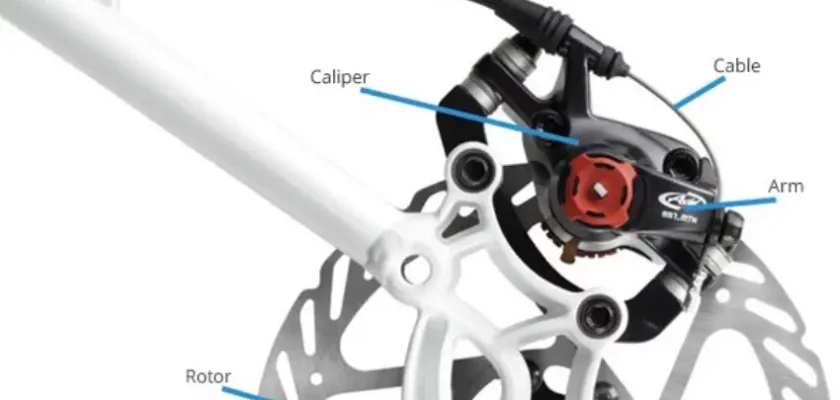
Introduction to Cable Disc Brakes
Cable disc brakes are a popular braking system found on modern bicycles. They offer excellent stopping power and are often preferred by mountain bikers and commuters. The key advantage of cable disc brakes is their consistent performance in different weather conditions.
However, to ensure optimal braking, it is crucial to properly adjust and maintain these brakes. In this article, we will guide you through the process of adjusting cable disc brakes on a bicycle.
Gather the necessary tools
Before you start adjusting your cable disc brakes, it is essential to gather the necessary tools. Here is a list of items you will need:
- Set of Allen wrench or hex key set
- Adjustable wrench or spanner
- Cable cutters or sharp cable snips
- Needle-nose pliers
- Rotor truing tool
- Brake pad alignment tool (optional)
Inspect your brakes and rotors
Before diving into the adjustment process, take a few minutes to inspect your disc brakes and rotors. Look out for any noticeable issues such as:
- Excessive wear on the brake pads
- Contamination or glazing on the brake pads or rotors
- Loose or damaged brake cables
- Bent or warped rotors
If you notice any of these problems, address them before proceeding with the adjustment process. It is important to have a smooth and well-maintained braking system for safe riding.
Adjusting the cable tension
One of the key factors in adjusting cable disc brakes is getting the cable tension just right. Here’s how you can do it:
- Start by loosening the cable anchor bolt on the brake caliper using an Allen wrench or hex key. This will release the tension on the cable.
- Pull the cable tight while holding the brake lever. This will pull the brake pads closer to the rotor.
- While holding the cable tight, tighten the anchor bolt on the brake caliper. Make sure it is secure but not overly tight, as you may need to readjust later.
- Release the brake lever and check the gap between the brake pads and rotor. It should be approximately the thickness of a business card. Adjust the cable tension by repeating steps 1-3 until you achieve the desired gap.
Aligning the brake caliper
Proper alignment of the brake caliper is crucial for optimal brake performance. Here is how you can align your brake caliper:
- Loosen the brake caliper mounting bolts on the frame using an Allen wrench or hex key. This will allow the caliper to move freely.
- Squeeze the brake lever and hold it tight. This will position the brake pads against the rotor.
- While holding the brake lever, tighten the caliper mounting bolts. Start by tightening the top bolt, then the bottom bolt, alternating between the two until both are securely tight.
- Release the brake lever and spin the wheel. Check for any rubbing or dragging of the brake pads against the rotor. If you notice any, proceed to the next step.
Adjusting the brake pad clearance
If your brake pads are rubbing against the rotor, you’ll need to adjust the clearance. Here’s how to do it:
- Locate the brake pad adjustment bolts on the brake caliper. These are usually located on the inside of the caliper.
- Using an Allen wrench or hex key, loosen the bolts slightly. This will allow you to move the brake pads.
- Gently push or pull the brake pads away from the rotor to increase the clearance. Make sure both pads are evenly spaced from the rotor.
- Once the desired clearance is achieved, tighten the adjustment bolts.
- Check the clearance by spinning the wheel. Ensure that the pads do not rub against the rotor.
Checking rotor trueness
A warped or bent rotor can cause uneven braking or noise. To check the trueness of your rotor, follow these steps:
- Inspect the rotor visually. Look for any visible warping or bending.
- If you suspect the rotor is not true, use a rotor truing tool to straighten it. Place the tool on the rotor and adjust the tool’s position until it contacts the rotor where it’s out of true.
- Gently squeeze the brake lever to apply slight pressure on the rotor, causing it to bend toward the truing tool.
- Rotate the wheel and observe if there is any improvement in the rotor’s trueness. Repeat the process if needed until the rotor spins true.
Testing and fine-tuning
After adjusting the cable disc brakes, it is important to test and fine-tune their performance. Take your bike for a short ride and make the following checks:
- Test the effectiveness of the brakes by applying gentle pressure to the brake levers. Ensure that the bike slows down smoothly and comes to a complete stop.
- Listen for any unusual noises or squeaks during braking. If you hear such noises, make further adjustments to address the issue.
- Check the brake lever feel. It should engage smoothly and have a firm, responsive feel. If the lever feels spongy or too soft, you may need to bleed the brakes or check for air in the system.
Maintenance and regular checks
Once you have successfully adjusted your cable disc brakes, it is important to perform regular maintenance checks to ensure continued optimal performance. Here are some maintenance tips:
- Regularly inspect the brake pads for wear. Replace them when they are worn down to the recommended thickness.
- Keep the rotors clean and free from contaminants like oil, grease, or dirt.
- Check the brake cables for signs of fraying or damage. Replace them if necessary.
- Routinely inspect the brake caliper bolts and mounting hardware for tightness.
By following these adjustment and maintenance steps, you can ensure that your cable disc brakes provide consistent and reliable stopping power, allowing you to ride with confidence and safety.
Remember, if you are unsure about any aspect of the adjustment process or encounter any difficulties, it is always best to consult a professional bike mechanic for assistance.
Frequently Asked Questions
1. How do I know if my cable disc brakes need adjusting?
Check if the brake pads are touching the rotor when the brake lever is released, or if there’s excessive play in the lever before it engages. Both indicate the need for adjustment.
2. What tools do I need to adjust cable disc brakes?
You’ll need an Allen wrench or screwdriver (depending on your brake system), a clean cloth, and possibly a 5mm open-end wrench or adjustable wrench for caliper adjustment.
3. How do I adjust the brake caliper position on cable disc brakes?
Loosen the mounting bolts on the caliper, align the caliper so that the brake pads are positioned evenly on both sides of the rotor, and then tighten the bolts back up.
4. How can I adjust the brake pad clearance on cable disc brakes?
If the pads are too close to the rotor, use the pad-adjusting knob or bolt to increase clearance. If they’re too far away, squeeze the brake lever and manually adjust the position of the caliper.
5. How can I fine-tune the cable tension on cable disc brakes?
Locate the barrel adjuster on the brake lever or caliper, turn it counterclockwise to increase cable tension (pads move closer to the rotor), or clockwise to decrease tension (pads move away from the rotor).
Final Thoughts
In conclusion, learning how to adjust cable disc brakes on a bicycle is a valuable skill for any cyclist. By following the step-by-step guide provided in this article, riders can ensure their brakes are properly aligned and functioning optimally.
From adjusting the brake calipers to fine-tuning the cable tension, every aspect of the adjustment process has been covered.
Properly adjusted disc brakes not only improve stopping power and overall safety, but also contribute to a smoother and more enjoyable riding experience.
With the knowledge gained from this article, cyclists can confidently perform regular maintenance on their brakes, keeping them in top condition.
Remember, safety is of utmost importance, so it is always recommended to double-check the adjustments and seek professional help if needed.