
Coaster brakes have been a staple in the cycling world for decades, offering simplicity and convenience. However, even the best brakes can sometimes require adjustment to ensure optimal performance.
Whether you’re a seasoned rider or new to the world of bicycles, understanding how to adjust coaster brakes on a bike is a crucial skill that can increase your safety and overall enjoyment while cycling.
So, let’s dive in and discover the key steps to adjust your coaster brakes effectively. By the end of this article, you’ll have the confidence and knowledge to fine-tune your brakes, improving your riding experience and ensuring a safer journey.
Adjust Coaster Brakes On Bike: Easy Guides
Coaster brakes are a popular type of braking system found on many bikes, particularly those designed for casual riders or children. While coaster brakes are known for their simplicity and ease of use, they still require regular maintenance and adjustment to ensure optimal performance and safety.
Why Adjust Coaster Brakes?
Before we dive into the adjustment process, let’s understand why it is necessary to adjust the coaster brakes periodically. Over time, coaster brakes can become loose, making it harder to engage the braking mechanism effectively. Adjusting and tightening the brakes helps to improve stopping power, responsiveness, and overall safety.
Tools You’ll Need
To adjust the coaster brakes on your bike, you’ll need a few tools that will make the process easier and more efficient. Here’s a list of tools you’ll need:
- Wrench set
- Screwdriver (typically a flathead)
- Needle-nose pliers (optional but helpful)
- Rag or towel
Step-by-Step Process
Now that you have your tools ready, let’s walk through the step-by-step process of adjusting coaster brakes:
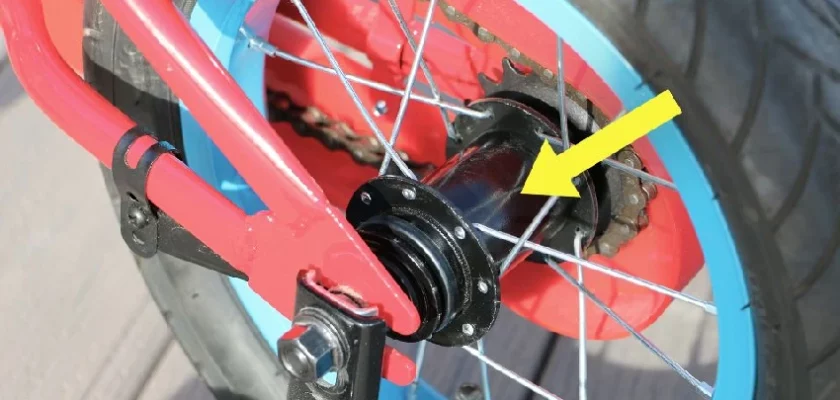
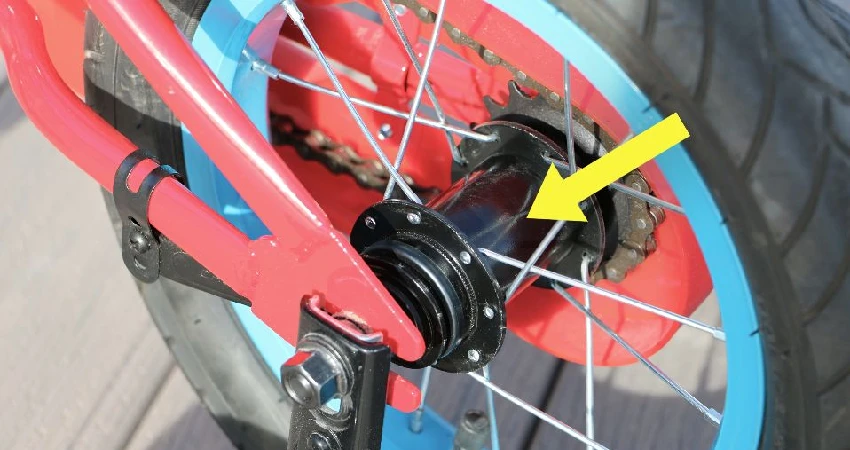
Step 1: Identify the Coaster Brake Hub
The coaster brake hub is usually located on the rear wheel of the bike. It consists of a shell, an axle, an indicator chain, an internal brake shoe, brake arm, and a cone adjuster. Familiarize yourself with these components before proceeding to the adjustment.
Step 2: Secure the Bike
Place your bike on a stable surface and ensure it is secure to prevent any accidents while working on it. You can use a bike stand, a stable wall, or ask a friend to hold the bike upright for you.
Step 3: Loosen the Nut
Using an appropriate wrench, loosen the nut on the non-chain side of the rear wheel axle. By loosening this nut, you will be able to adjust the brake tension.
Step 4: Adjust the Brake Tension
Adjusting the brake tension is crucial to ensuring effective braking. To do this, follow these steps:
- Locate the cone adjuster on the brake arm of the coaster brake hub.
- Turn the cone adjuster clockwise to increase the brake tension or counterclockwise to decrease it.
- Make small adjustments at a time and test the brakes to check their effectiveness. Repeat the process until you achieve the desired tension.
Note: It’s important to strike a balance between having the brakes tight enough for effective stopping power and loose enough that the wheel can still rotate freely.
Step 5: Check Brake Arm Alignment
The brake arm should be aligned properly for optimal brake performance. Follow these steps to ensure the alignment is correct:
- Observe the position of the brake arm in relation to the chain stay.
- The brake arm should be perpendicular to the chain stay.
- If the alignment is off, use a wrench to loosen the nut on the axle, adjust the brake arm position, and then tighten the nut.
Step 6: Test Your Brakes
Once you have completed the adjustments, it’s crucial to test your brakes before riding. Here’s how you can do that:
- Stand beside your bike and push it forward.
- Simultaneously apply the brakes by pedaling backward, using your foot on the pedal.
- The bike should come to a smooth and controlled stop without any excessive noise or grabbing.
If the brakes do not feel right or if the bike does not stop as expected, repeat the adjustment process or consider seeking assistance from a professional bike mechanic.
Additional Tips and Considerations
To ensure a successful adjustment of your coaster brakes, consider the following tips and important factors:
- If you are unsure about any steps or require clarification, refer to your bike’s instruction manual or consult a qualified bike mechanic.
- Clean and lubricate the coaster brake hub periodically to maintain smooth operation.
- When adjusting the brake tension, make sure to keep the brake arm centered for optimum performance.
- If your coaster brakes still do not perform adequately even after adjusting them, it may be time to replace worn-out components or seek professional assistance.
- Regularly inspect your bike’s brake pads and replace them if they are worn down.
- Always wear proper protective gear, including a helmet, when riding your bike, regardless of the braking system in use.
By following the steps outlined above and paying attention to the details, you can easily adjust the coaster brakes on your bike and ensure a safer and more enjoyable riding experience.
Remember, practice makes perfect, so don’t be discouraged if you find it slightly challenging at first. With time and experience, adjusting coaster brakes will become second nature to you. Happy riding!
Frequently Asked Questions
1. How can I tell if my coaster brakes need adjusting?
If your coaster brakes feel loose or don’t engage smoothly, it’s a sign they need adjustment. You may also notice the bike not stopping effectively or the rear wheel spinning when you pedal backward.
2. What tools do I need to adjust the coaster brakes?
To adjust coaster brakes, you’ll need a wrench for removing the wheel, an adjustable wrench or pliers for adjusting the brake arm, and a screwdriver for loosening or tightening the brake cone.
3. How do I tighten or loosen a coaster brake?
To tighten the coaster brake, turn the brake arm clockwise. To loosen it, turn the brake arm counterclockwise. Make small adjustments until you achieve the desired tension on the brakes.
4. How do I align the brake arm on a coaster brake?
To align the brake arm, ensure it is parallel to the chainstay. Loosen the brake arm nut, center it, and retighten the nut. This ensures proper brake engagement and optimal braking performance.
5. Can I adjust the coaster brakes myself, or should I seek professional help?
Coaster brake adjustment can usually be done at home without professional help. However, if you encounter difficulties or are unsure about the process, it’s always best to consult a bike mechanic for assistance.
Final Thoughts
In conclusion, adjusting coaster brakes on a bike is a simple yet crucial skill for every cyclist. By following the step-by-step guide provided, anyone can easily ensure their brakes are functioning optimally, ultimately enhancing both safety and performance.
Remember to start by loosening the brake arm and adjusting the brake shoe position as needed. Then, tighten the brake arm until there is a slight resistance when spinning the wheel.
Finally, test the brakes and make any necessary adjustments until they engage smoothly and effectively. Now, armed with this knowledge on how to adjust coaster brakes on a bike, you can confidently hit the road knowing your brakes are in perfect working condition.