
Trek is a well-known bike brand known for how well they work. One thing that makes Trek bikes so easy to ride is that the handlebar height can be changed. This lets riders find the one that fits their needs the best.
Many riders like Trek bikes because they are well-made and work well. You need to set the handlebars to the right height for the best ease, control, and posture while riding.
You want to know how to raise the handlebars on a trek bike? This article will show you to raise the handlebars on a Trek bike so that you can ride it more comfortably.
How To Determine The Appropriate Handlebar Height For A Trek Bike
Finding the right handlebar height for your Trek bike is important if you want to ride easily and healthily. Here are some steps that will help you figure out the right height for the handlebars:
Style and Preference: Consider your riding style and preferences when choosing handlebar height. Choose a lower handlebar height if you prefer a more active and aerodynamic ride. A higher handlebar height may be better for a more relaxed and upright position.
Body Mechanics and Flexibility: Consider your body’s flexibility when adjusting your handlebar height to avoid discomfort in your back, neck, and shoulders. Consider your arm height based on your flexibility, core strength, and any injuries or limitations you have.
Bike Fit Assessment: Give your bike a thorough fit exam. This can be done by talking to a skilled bike fitter or using online calculators or guides for a bike fit. These tools usually suggest an initial handlebar height based on your height, inseam length, torso length, and arm length.
Initial Adjustment: Based on the assessment or suggestions, start with a handlebar height that is on the low side. It’s always best to start with a little higher handlebars and then make changes as needed. This lets you fine-tune the setting based on how comfortable you are and how you like to ride.
Test Rides and Adjustments: Take a few test rides on your Trek bike with the handlebars at the starting height. Pay attention to any pain or strain in your body, especially in your neck, shoulders, and lower back. If you feel uncomfortable or like you can’t keep control of the bike, this could mean that the handlebars need to be changed.
Changes Made Gradually: Adjust the handlebars in small increments by moving them up or down about 5mm at a time. Test ride the bike after each adjustment to see how it affects your comfort and riding experience. Make small adjustments until you find the right height that gives you optimal ease, stability, and control.
How To Adjust Trek Bicycle Bars
Raising the handlebars is an easy job. Just read the steps to do the job like a professional:
Step 1: Gather The Required Tools
Before starting the handlebar adjustment process, make sure you have the following tools:
Allen wrench set: Depending on your bike’s specifications, different sizes may be needed.
Adjustable wrench: This may be necessary to loosen or tighten certain components.
Step 2: Evaluate The Existing Setup
Take a moment to analyze your current handlebar position. Identify the style of the handlebar stem on your Trek bike, as it will determine the specific steps required for adjustment. The two most common stem styles are quill stems and threadless stems.
Quill stems: These stems have a long vertical tube that slides into the bike’s fork steerer tube. They are secured in place with a single bolt at the top. To raise the handlebars on a quill stem, you will need to adjust the stem’s height.
Threadless stems: These stems consist of a horizontal steerer tube and a stem that clamps onto it. The stem height can be adjusted by adding or removing spacers and by repositioning the stem itself.
Step 3: Raising Handlebars On Quill Stems
If your Trek bike has a quill stem, follow these steps:
Loosen the bolt: Locate the bolt at the top of the stem. Use an appropriately sized Allen wrench or adjustable wrench to loosen the bolt. Turn it counterclockwise until it is loose enough to allow the stem to move.
Adjust the stem height: Gently lift the stem upwards to the desired height. Take note of the maximum height indicator line on the stem. Ensure that the stem remains aligned with the front wheel.
Tighten the bolt: Once you have set the desired height, tighten the bolt by turning it clockwise. Make sure it is securely tightened to prevent any movement or slippage during rides.
Test the adjustment: Give the handlebars a firm shake and apply moderate pressure to ensure they are properly secured. Make any additional adjustments if necessary.
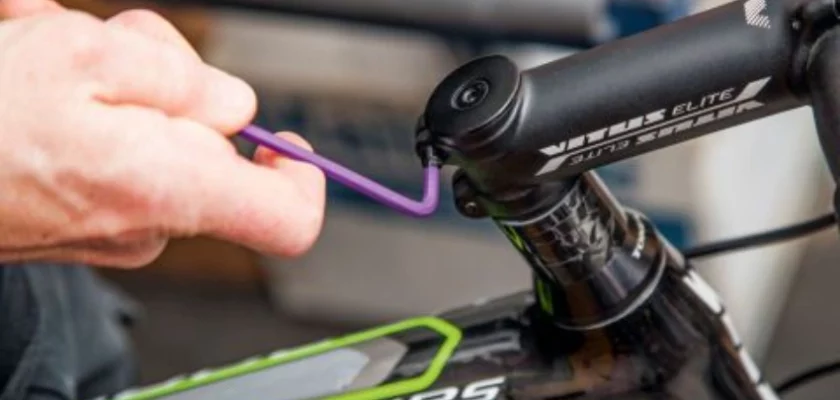
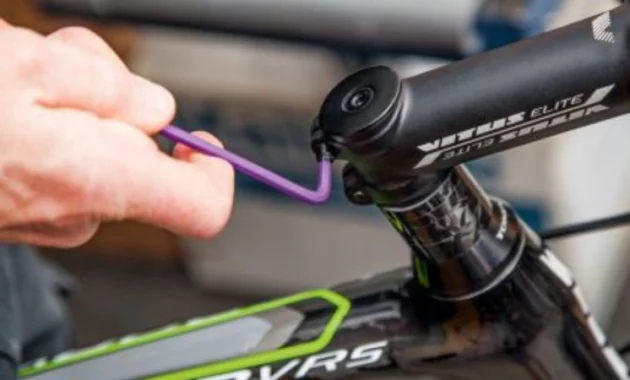
Step 4: Raising Handlebars On Threadless Stems
If your Trek bike has a threadless stem, the process involves adjusting the stem’s position and possibly adding or removing spacers:
Evaluate spacer arrangement: Inspect the spacers positioned above and below the stem. If there are no spacers above the stem, proceed to step 2. If there are spacers above the stem, you will need to reposition them below it.
Loosen stem bolts: Locate the bolts on the side of the stem where it clamps onto the steerer tube. Loosen these bolts by turning them counterclockwise using an appropriately sized Allen wrench.
Adjust the stem height: Gently lift the stem to the desired height. If you need to add or remove spacers, slide them below the stem or lift them off the steerer tube, respectively.
Align the stem: Ensure that the stem is aligned with the front wheel. Verify that the gap between the stem and the top tube is equal on both sides.
Tighten the stem bolts: Once the stem is at the desired height and properly aligned, tighten the stem bolts by turning them clockwise. Start with a snug fit, and then gradually increase the tightness of each bolt in a crisscross pattern until they are securely tightened.
Test the adjustment: Similar to the quill stem adjustment, test the handlebars by shaking them and applying pressure. Confirm that everything is secure and there is no movement or slippage.
Conclusion
Properly adjusting the handlebars on your Trek bike is crucial for maintaining a comfortable and efficient riding position. By following the step-by-step instructions outlined in this essay, you can confidently raise the handlebars on both quill and threadless stems.
Remember to pay attention to safety, ensure all components are tightened correctly, and test the adjustments before embarking on your next cycling adventure. Enjoy your ride with elevated handlebars, providing you with a more enjoyable and ergonomic cycling experience.
